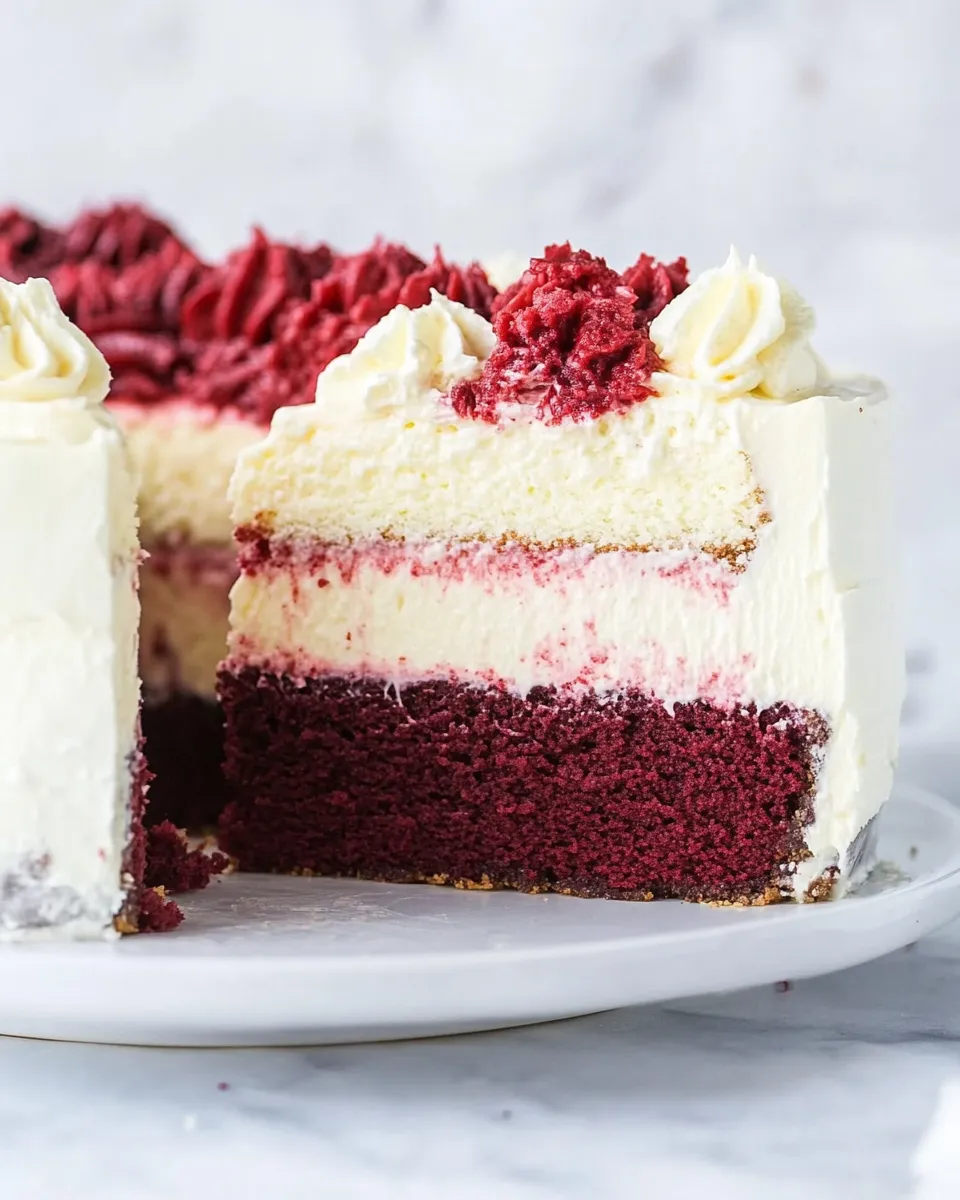
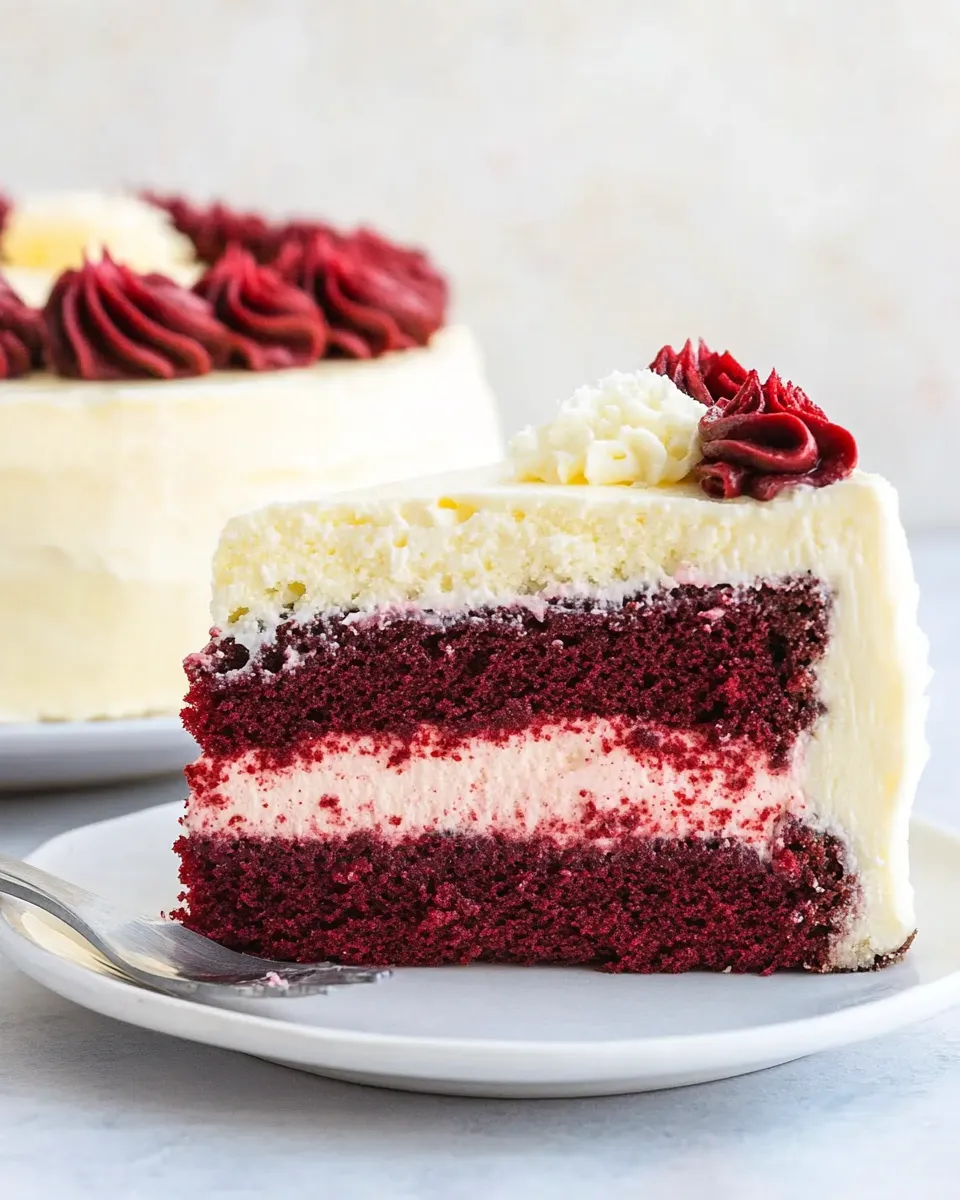
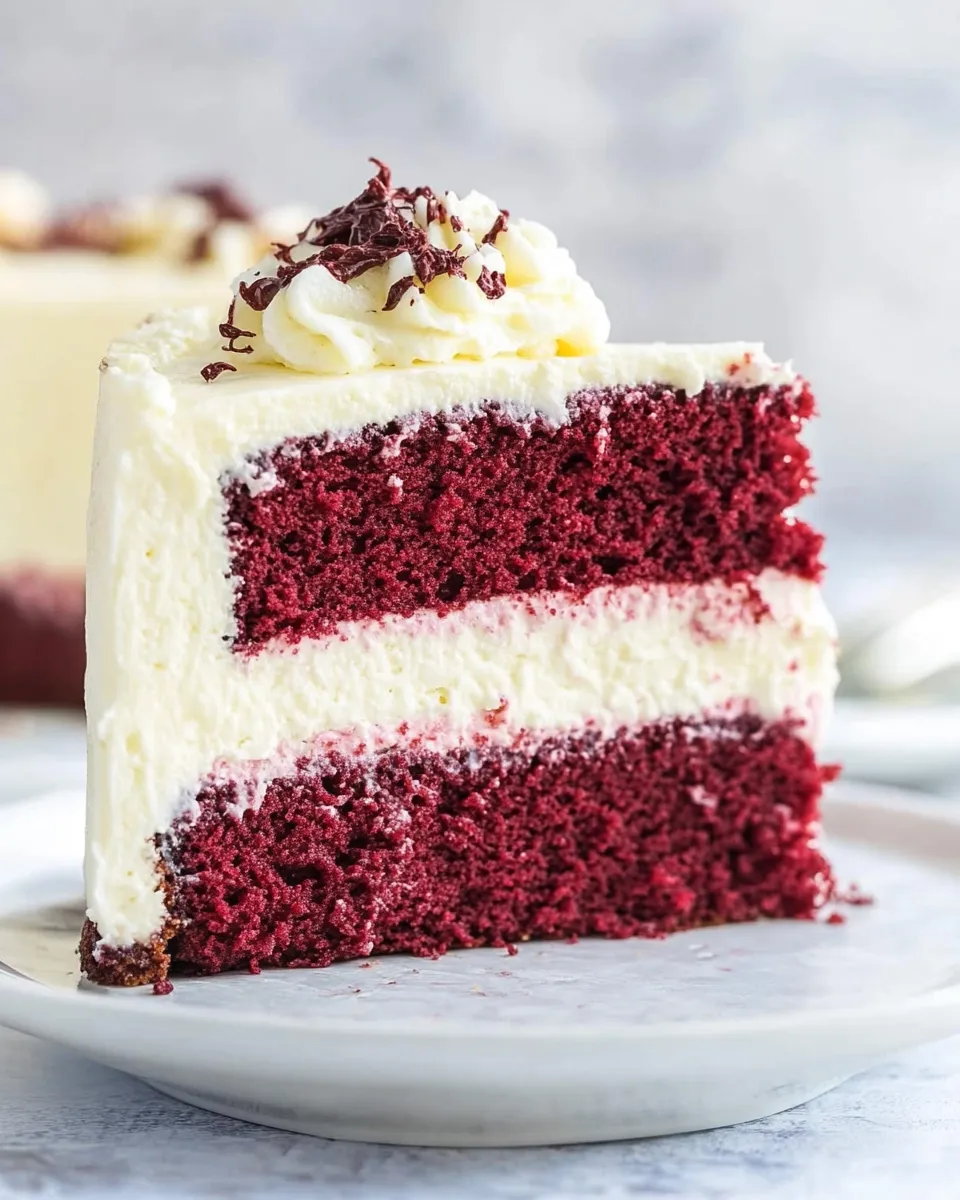
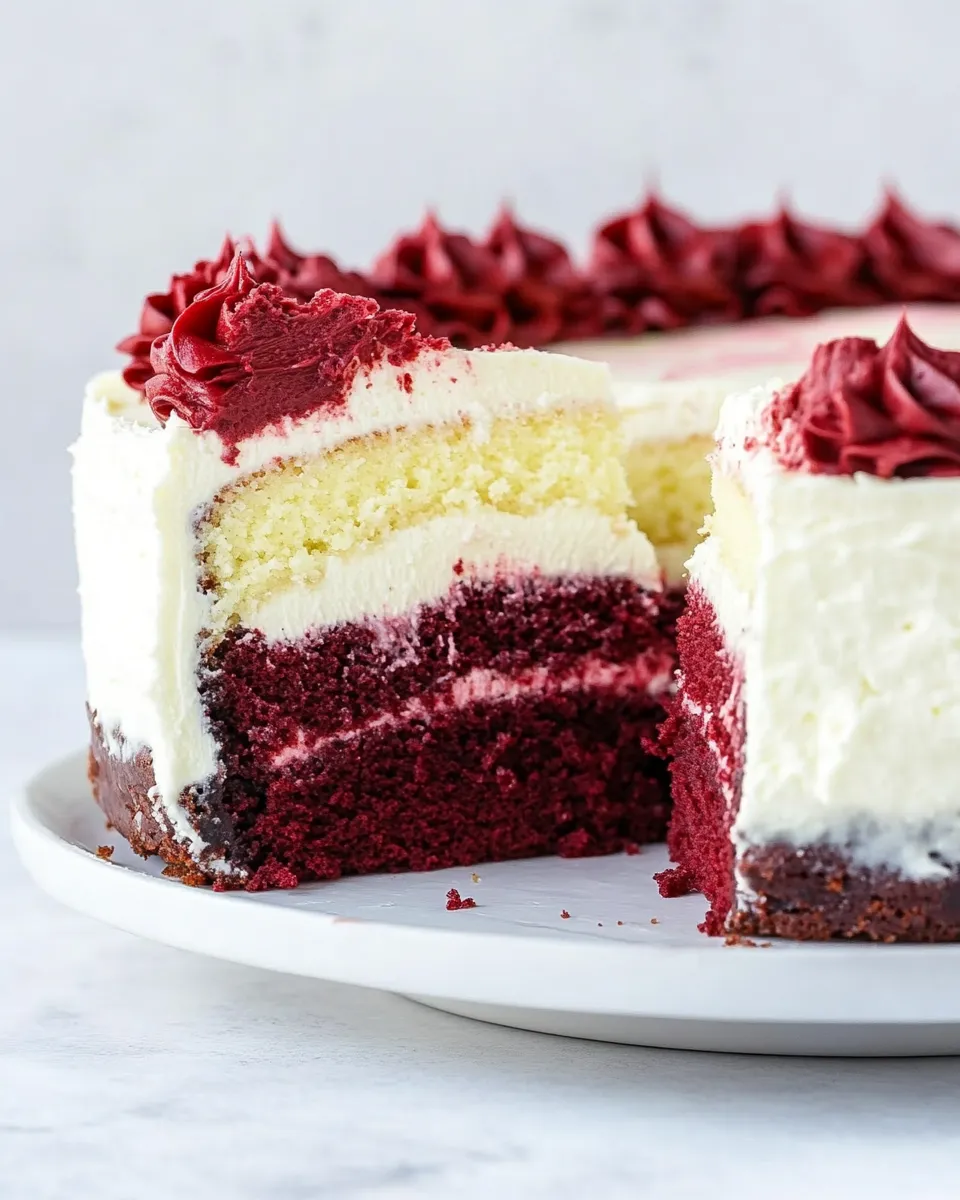
Red Velvet Cake Cheesecake is the ultimate dessert that combines the rich, velvety flavor of red velvet cake with the creamy texture of cheesecake. This decadent treat is perfect for special occasions or as a delightful indulgence on any day. With its beautiful color and luscious cream cheese frosting, it’s sure to impress anyone who takes a bite. Using baking spray ensures that your cheesecake bakes beautifully and releases without a hitch.
Why This Recipe Works
This recipe works because it harmoniously merges two beloved desserts into one show-stopping cake. The red velvet cake adds a hint of cocoa and a soft, moist texture, while the cheesecake layer brings a rich and tangy flavor profile. The combination is not only visually stunning but also irresistibly delicious. Using baking spray for the pans ensures that the cake releases easily, keeping the layers intact and perfect for stacking.
What You’ll Need
- 2 ½ cups all-purpose flour
- 1 ½ cups sugar
- 1 teaspoon baking soda
- 1 teaspoon baking powder
- ½ teaspoon salt
- ⅓ cup cocoa powder
- 2 large eggs, at room temperature
- 1 ½ cups vegetable oil
- 1 cup buttermilk, at room temperature
- 1 teaspoon white distilled vinegar
- 1 teaspoon vanilla extract
- 1 teaspoon red gel food coloring or 2 tablespoons regular food coloring
- 24 ounces cream cheese, softened to room temperature
- 1 cup granulated sugar
- 2 large eggs, at room temperature
- ½ tablespoon vanilla extract
- 1 cup sour cream, at room temperature
- 2 tablespoons all-purpose flour
- ½ teaspoon salt
What You’ll Need (Gear)
- 9-inch round cake pans: To create the perfect layers for your cheesecake.
- Mixing bowls: For combining your ingredients.
- Electric mixer: To ensure smooth and creamy batter.
- Spatula: For scraping down the sides and mixing.
- Cooling rack: To cool your cakes properly before frosting.
- Oven: To bake your delicious creation.
Cooking Red Velvet Cake Cheesecake: The Process
Step 1: Preheat the Oven
Preheat your oven to 350°F (175°C). This ensures your Red Velvet Cake Cheesecake bakes evenly.
Step 2: Prepare the Pans
Generously spray your 9-inch round cake pans with baking spray. This will help the cakes release easily after baking, allowing for a flawless assembly.
Step 3: Mix Dry Ingredients
In a large mixing bowl, whisk together the all-purpose flour, sugar, baking soda, baking powder, salt, and cocoa powder until well combined.
Step 4: Combine Wet Ingredients
In another bowl, beat together the eggs, vegetable oil, buttermilk, vinegar, vanilla extract, and red gel food coloring until smooth and well blended.
Step 5: Combine Mixtures
Gradually add the wet ingredients to the dry ingredients, mixing until just combined. Do not overmix; a few lumps are okay.
Step 6: Bake the Cakes
Divide the batter evenly between the prepared cake pans. Bake in the preheated oven for about 25-30 minutes or until a toothpick inserted into the center comes out clean. Allow the cakes to cool in the pans for 10 minutes before transferring them to a cooling rack.
Step 7: Prepare the Cheesecake Filling
While the cakes are cooling, prepare the cheesecake filling. In a large bowl, beat the softened cream cheese and granulated sugar until creamy. Add the eggs, vanilla extract, sour cream, flour, and salt. Beat until smooth and thoroughly combined.
Step 8: Bake the Cheesecake Layer
Pour the cheesecake filling into a springform pan and bake in the oven at 325°F (160°C) for 50-60 minutes, or until the center is set but slightly jiggly. Turn off the oven and let the cheesecake cool in the oven with the door slightly ajar for about an hour.
Step 9: Assemble the Cakes
Once the cakes and cheesecake are completely cooled, place one layer of red velvet cake on a serving platter. Spread a generous layer of cream cheese frosting on top, then carefully place the cheesecake layer on top of the frosting. Add another layer of frosting on top of the cheesecake, then finish with the second layer of red velvet cake. Frost the top and sides of the cake with the remaining cream cheese frosting.
Step 10: Chill and Serve
Refrigerate the assembled cake for at least 2 hours to set before slicing. Serve chilled and enjoy every delicious bite of your Red Velvet Cake Cheesecake!
Budget & Availability Swaps
- Buttermilk: You can substitute with regular milk mixed with a tablespoon of vinegar or lemon juice.
- Sour cream: Greek yogurt can be used as a lower-fat alternative.
- Vegetable oil: Can be replaced with melted coconut oil or canola oil.
- Red gel food coloring: Feel free to use natural food colorings or beet juice for a healthier option.
Problems & Prevention
- Dry Cake: Be careful not to overbake. Check for doneness a few minutes before the recommended time.
- Cracked Cheesecake: Avoid overmixing the cheesecake batter and ensure not to overbake.
- Sticking to the Pan: Always use baking spray or line with parchment paper to prevent sticking.
- Uneven Layers: Use a kitchen scale to ensure equal weight in your cake pans for even layers.
Meal Prep & Storage Notes
Red Velvet Cake Cheesecake can be made ahead of time. Store it in the refrigerator for up to 5 days. You can also freeze the individual layers. Wrap them tightly in plastic wrap and freeze for up to 3 months. To serve, simply thaw in the refrigerator overnight and assemble as desired.
Frequently Asked Questions
Can I use a different cake flavor instead of red velvet?
Absolutely! This cheesecake recipe can be adapted with any flavor of cake. Vanilla or chocolate cakes work particularly well.
How can I make the frosting less sweet?
You can reduce the sugar in the cream cheese frosting recipe or add a bit of lemon juice to balance the sweetness with tanginess.
Is it necessary to chill the cake before serving?
Yes, chilling the cake helps to set the layers and allows the flavors to meld together beautifully. It also makes slicing easier.
Can I make this gluten-free?
Yes, you can substitute all-purpose flour with a gluten-free flour blend. Just ensure the blend contains a binding agent.
Time to Try It
Now that you have the complete guide to crafting a stunning Red Velvet Cake Cheesecake, gather your ingredients and start baking! This dessert is not just a feast for the eyes but also a celebration for your taste buds. Whether for a birthday, holiday, or just because, this cake is sure to be a hit. Enjoy the process and the indulgent results!
Red Velvet Cake Cheesecake
Ingredients
Equipment
Method
- Preheat your oven to 350°F (175°C). This ensures your Red Velvet Cake Cheesecake bakes evenly.
- Generously spray your 9-inch round cake pans with baking spray. This will help the cakes release easily after baking, allowing for a flawless assembly.
- In a large mixing bowl, whisk together the all-purpose flour, sugar, baking soda, baking powder, salt, and cocoa powder until well combined.
- In another bowl, beat together the eggs, vegetable oil, buttermilk, vinegar, vanilla extract, and red gel food coloring until smooth and well blended.
- Gradually add the wet ingredients to the dry ingredients, mixing until just combined. Do not overmix; a few lumps are okay.
- Divide the batter evenly between the prepared cake pans. Bake in the preheated oven for about 25-30 minutes or until a toothpick inserted into the center comes out clean. Allow the cakes to cool in the pans for 10 minutes before transferring them to a cooling rack.
- While the cakes are cooling, prepare the cheesecake filling. In a large bowl, beat the softened cream cheese and granulated sugar until creamy. Add the eggs, vanilla extract, sour cream, flour, and salt. Beat until smooth and thoroughly combined.
- Pour the cheesecake filling into a springform pan and bake in the oven at 325°F (160°C) for 50-60 minutes, or until the center is set but slightly jiggly. Turn off the oven and let the cheesecake cool in the oven with the door slightly ajar for about an hour.
- Once the cakes and cheesecake are completely cooled, place one layer of red velvet cake on a serving platter. Spread a generous layer of cream cheese frosting on top, then carefully place the cheesecake layer on top of the frosting. Add another layer of frosting on top of the cheesecake, then finish with the second layer of red velvet cake. Frost the top and sides of the cake with the remaining cream cheese frosting.
- Refrigerate the assembled cake for at least 2 hours to set before slicing. Serve chilled and enjoy every delicious bite of your Red Velvet Cake Cheesecake!
Notes
- This cake can be made ahead of time and stored in the refrigerator for up to 5 days.
- Wrap individual layers tightly in plastic wrap and freeze for up to 3 months.
- To make this gluten-free, substitute all-purpose flour with a gluten-free blend.