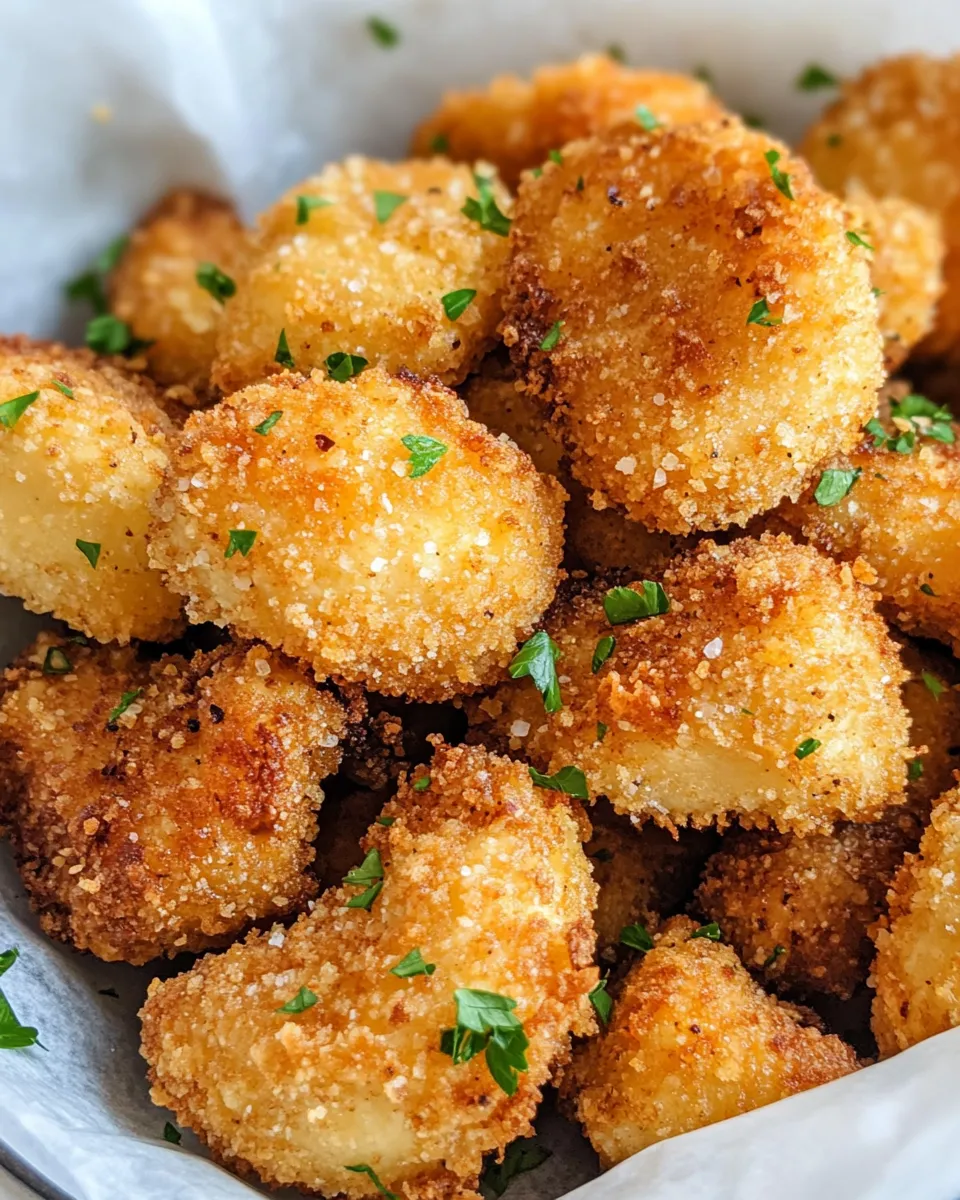
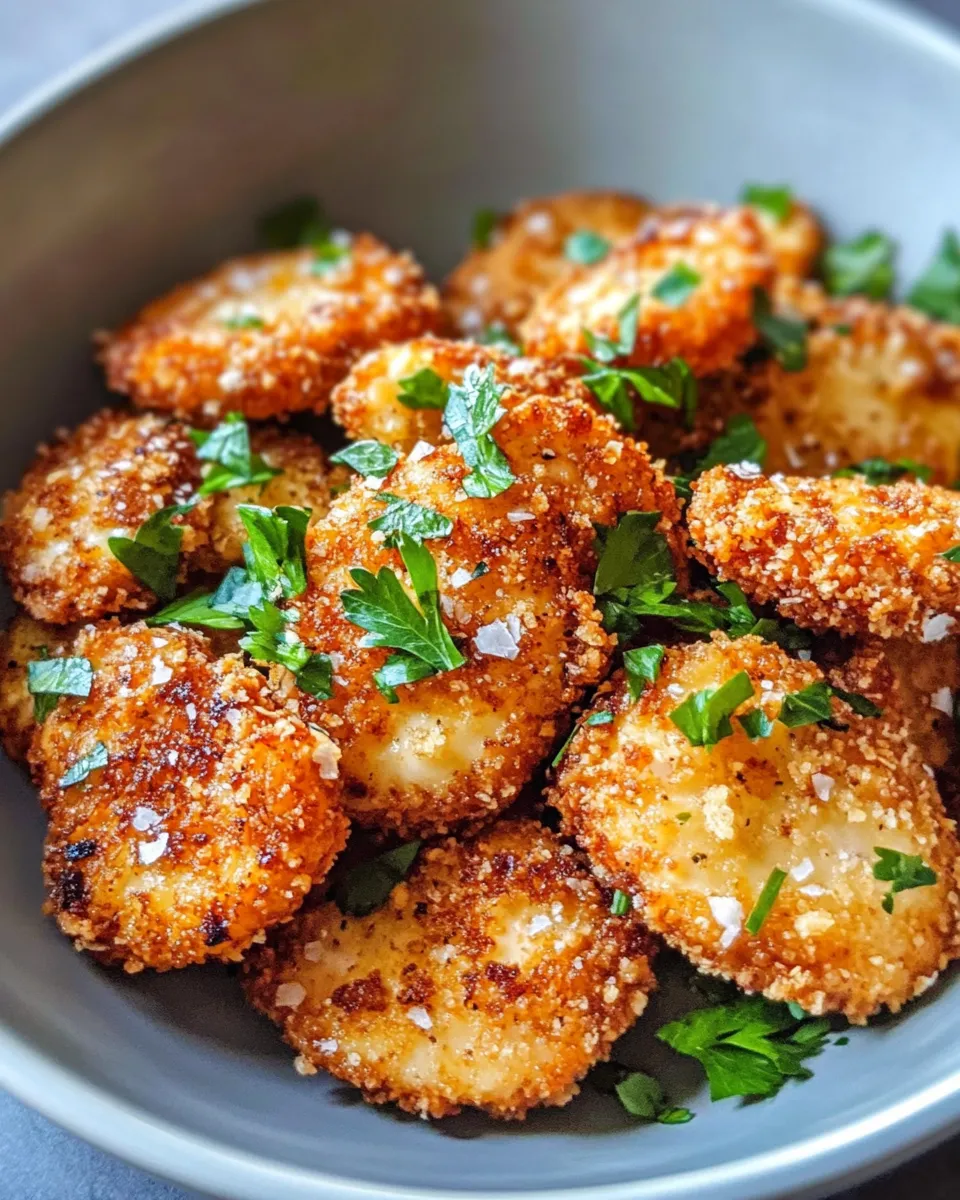
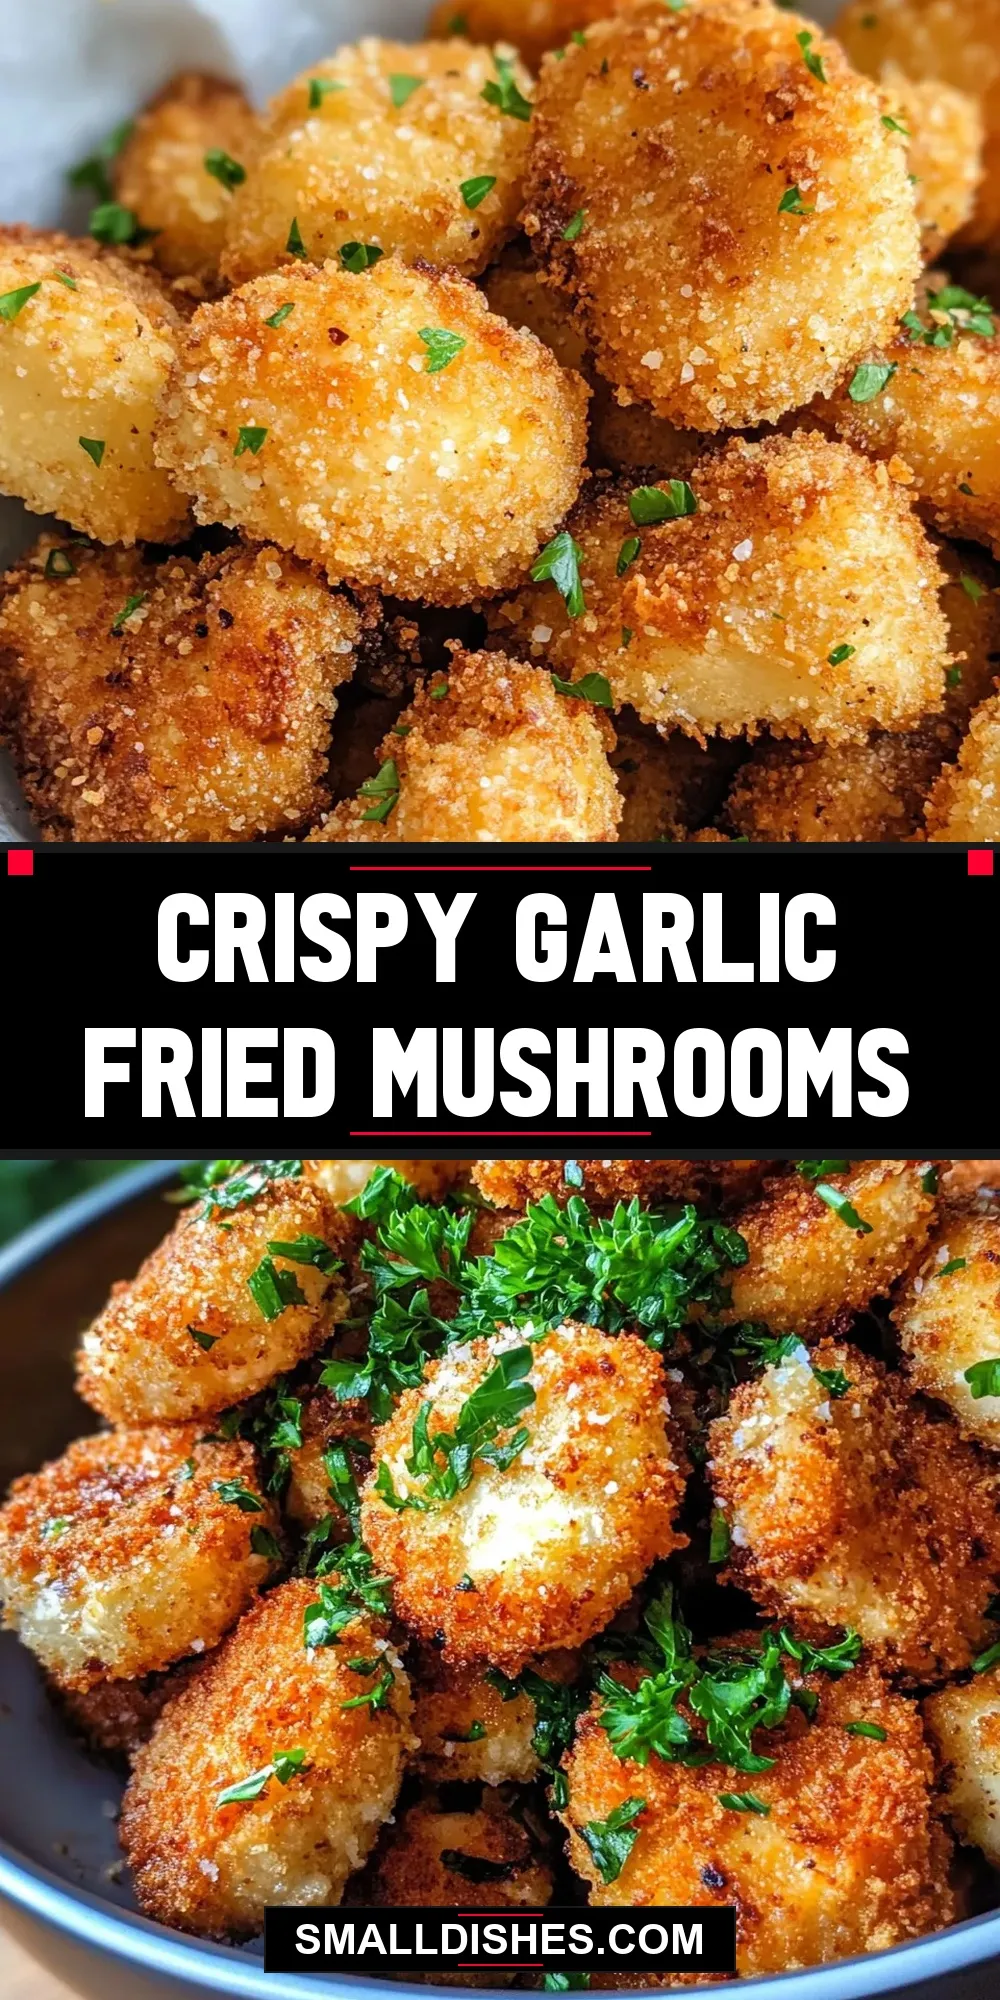
There’s something irresistibly delicious about Crispy Garlic Fried Mushrooms. These golden, crunchy bites are packed with a robust garlic flavor and a satisfying texture that makes them perfect as a snack, appetizer, or side dish. Whether you’re entertaining guests or craving something savory, this recipe delivers exactly what you want. With just a few simple ingredients and easy steps, you can whip up these crispy mushrooms that boast a perfect balance of crunch and garlicky goodness.
Why This Recipe Is Reliable
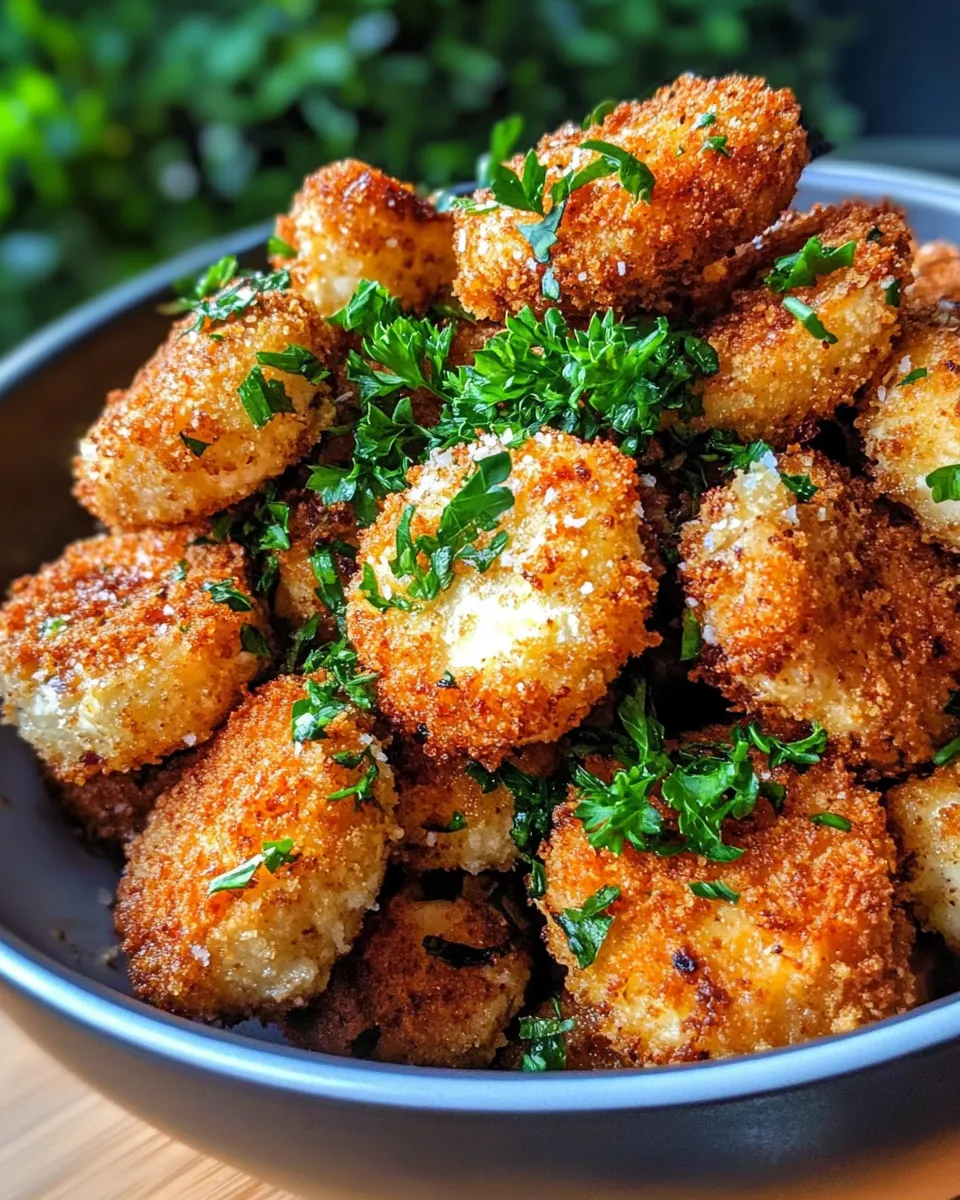
This recipe stands out because it strikes the perfect balance between flavor and texture. The mushrooms are coated in a well-seasoned breadcrumb mixture that crisps up beautifully when fried, while the minced garlic infuses every bite with a punch of savory aroma. The use of paprika adds a subtle smoky depth, and the double-step breading process ensures the coating clings well to the mushrooms without falling off. Plus, frying them in just the right amount of vegetable oil guarantees an even, golden crust. Tested multiple times, this method consistently yields crunchy, flavorful mushrooms that everyone loves.
What We’re Using
- 1 pound mushrooms, cleaned and sliced – Cremini or white button mushrooms work best for their firm texture.
- 4 cloves garlic, minced – Fresh garlic gives that authentic, sharp flavor.
- 1 cup breadcrumbs – Use plain or seasoned breadcrumbs depending on your preference.
- 1/2 cup all-purpose flour – Helps the coating stick and adds crispiness.
- 2 eggs, beaten – Acts as the binding agent for the breading.
- 1 teaspoon paprika – Adds a smoky warmth and vibrant color.
- 1 teaspoon salt – Enhances all the flavors.
- 1/2 teaspoon black pepper – For a mild kick and seasoning.
- Vegetable oil for frying – Choose a neutral oil with a high smoke point.
- Fresh parsley, chopped for garnish – Adds a fresh, herbal brightness.
Hardware & Gadgets
- Large skillet or frying pan: For shallow frying the mushrooms evenly.
- Mixing bowls: One for the flour mixture, one for the beaten eggs, and one for the breadcrumbs.
- Tongs or slotted spoon: To safely turn and remove the mushrooms from the hot oil.
- Paper towels or wire rack: For draining excess oil and keeping the mushrooms crispy.
- Sharp knife: To cleanly slice the mushrooms and mince the garlic.
Build Crispy Garlic Fried Mushrooms Step by Step
Step 1: Prepare Your Mushrooms and Garlic
Start by gently cleaning your mushrooms with a damp cloth or paper towel to remove any dirt. Avoid soaking them in water as mushrooms absorb moisture and can become soggy. Slice them evenly, about 1/4 inch thick, to ensure uniform cooking. Mince your garlic finely to release its full flavor during cooking.
Step 2: Set Up Your Breading Station
In separate bowls, combine the dry and wet ingredients for breading. Mix the all-purpose flour, paprika, salt, and black pepper in one bowl. Beat the two eggs in another bowl until smooth. Finally, place the breadcrumbs in a third bowl. This three-step setup will help you efficiently coat each mushroom slice.
Step 3: Coat the Mushrooms
Dredge each mushroom slice first in the flour mixture, shaking off the excess. Next, dip it into the beaten eggs, allowing any extra to drip off. Then press it firmly into the breadcrumbs, making sure each slice is fully covered. For an extra crispy crust, repeat the egg and breadcrumb step.
Step 4: Infuse Garlic Flavor
To incorporate the minced garlic, mix it into the breadcrumbs before coating. This technique ensures the garlic crisps along with the mushrooms, creating those irresistible Crispy Garlic Fried Mushrooms bites loaded with garlic goodness.
Step 5: Heat the Oil and Fry
Pour enough vegetable oil into your skillet to cover the bottom about 1/4 inch deep. Heat it over medium-high until shimmering but not smoking. Carefully add the coated mushrooms in a single layer, avoiding overcrowding. Fry for 2-3 minutes per side until golden brown and crispy.
Step 6: Drain and Garnish
Remove the mushrooms with tongs or a slotted spoon and place them on paper towels or a wire rack to drain excess oil. Sprinkle freshly chopped parsley over the top for a pop of color and freshness.
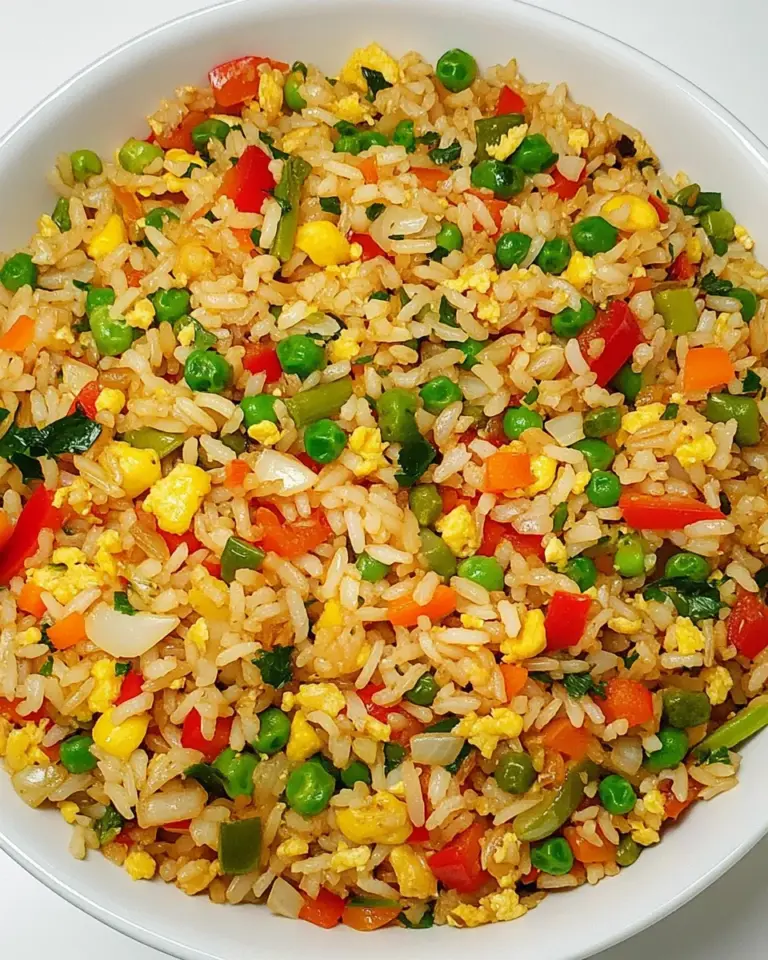
For a wonderful twist, try serving these mushrooms alongside a Garlic Butter Steak And Mushroom Skillet With Rice to elevate your meal with savory depth and texture contrast.
Tailor It to Your Diet
- For a gluten-free option, substitute the all-purpose flour and breadcrumbs with gluten-free versions or crushed gluten-free crackers.
- To reduce oil absorption, try baking the mushrooms in a preheated oven at 400°F (200°C) for 15-20 minutes, flipping halfway through.
- Add a pinch of cayenne pepper or chili powder to the breadcrumb mixture for a spicy kick.
- Use almond milk or your favorite dairy-free milk mixed with a teaspoon of apple cider vinegar instead of eggs for an egg-free coating.
What I Learned Testing
- Using fresh garlic mixed directly into the breadcrumbs intensifies the garlic flavor without burning in the oil.
- Double-dipping the mushrooms in egg and breadcrumbs creates a thicker, crunchier crust that holds up well.
- Maintaining the oil temperature between 350°F and 375°F helps achieve a golden crisp without greasy mushrooms.
- Draining on a wire rack instead of paper towels keeps the mushrooms crisp longer, preventing sogginess.
How to Store & Reheat
If you have leftovers, store your Crispy Garlic Fried Mushrooms in an airtight container in the refrigerator for up to 3 days. To reheat and keep them crispy, place them on a baking sheet and warm in a 375°F (190°C) oven for 8-10 minutes. Avoid microwaving as it can make the coating soggy.
Top Questions & Answers
Can I use other types of mushrooms for this recipe?
Absolutely! While cremini and white button mushrooms are ideal due to their firm texture, you can experiment with portobello or shiitake mushrooms. Just be mindful that some varieties have higher water content, which can affect crispiness.
Is it necessary to use paprika in the breading?
While paprika adds a nice smoky, slightly sweet flavor and a lovely color, you can omit it if you prefer. Alternatively, smoked paprika can enhance the smoky notes further.
How do I prevent the garlic from burning during frying?
Incorporating minced garlic into the breadcrumbs rather than frying it separately helps prevent burning. The garlic crisps up gently alongside the mushrooms without becoming bitter.
Can these mushrooms be made ahead of time?
Yes, you can prepare and bread the mushrooms in advance and store them in the refrigerator for a few hours before frying. However, for best texture, fry them just before serving.
Let’s Eat
There’s nothing quite like biting into a perfectly crispy, garlicky mushroom that melts in your mouth with every crunch. These Crispy Garlic Fried Mushrooms are a crowd-pleaser, easy to make, and incredibly satisfying. Whether you enjoy them as a snack, a side dish, or part of a larger meal, they bring a delightful combination of textures and flavors to your table. Pair them with your favorite dipping sauce or alongside a hearty dish to complete your meal.
Next time you’re craving something crispy and flavorful, give this recipe a try. The balance of garlic, paprika, and crunchy coating makes these mushrooms unforgettable, and you might even find yourself coming back for seconds. Happy cooking and even happier eating!
Share on Pinterest
Crispy Garlic Fried Mushrooms
Ingredients
Equipment
Method
- Start by gently cleaning your mushrooms with a damp cloth or paper towel to remove any dirt. Avoid soaking them in water as mushrooms absorb moisture and can become soggy. Slice them evenly, about 1/4 inch thick, to ensure uniform cooking. Mince your garlic finely to release its full flavor during cooking.
- In separate bowls, combine the dry and wet ingredients for breading. Mix the all-purpose flour, paprika, salt, and black pepper in one bowl. Beat the two eggs in another bowl until smooth. Finally, place the breadcrumbs in a third bowl.
- Dredge each mushroom slice first in the flour mixture, shaking off the excess. Next, dip it into the beaten eggs, allowing any extra to drip off. Then press it firmly into the breadcrumbs mixed with minced garlic, making sure each slice is fully covered. For an extra crispy crust, repeat the egg and breadcrumb step.
- Pour enough vegetable oil into your skillet to cover the bottom about 1/4 inch deep. Heat it over medium-high until shimmering but not smoking. Carefully add the coated mushrooms in a single layer, avoiding overcrowding. Fry for 2-3 minutes per side until golden brown and crispy.
- Remove the mushrooms with tongs or a slotted spoon and place them on paper towels or a wire rack to drain excess oil. Sprinkle freshly chopped parsley over the top for a pop of color and freshness.
Notes
- For gluten-free option, substitute all-purpose flour and breadcrumbs with gluten-free versions.
- Bake mushrooms at 400°F (200°C) for 15-20 minutes for a healthier alternative to frying.
- Double-dipping the mushrooms in egg and breadcrumbs creates a thicker, crunchier crust.
- Store leftovers in an airtight container in the refrigerator for up to 3 days; reheat in the oven to maintain crispiness.