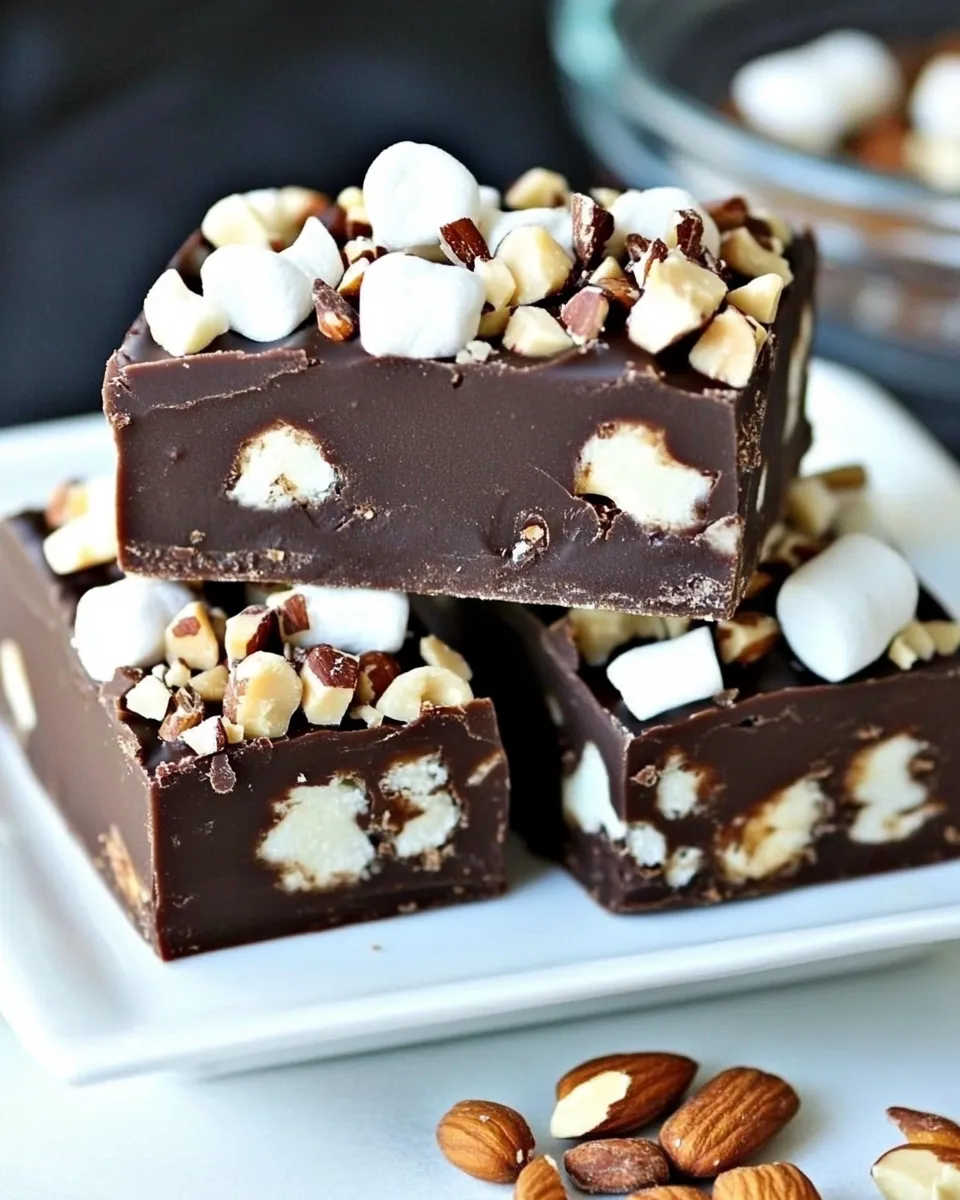
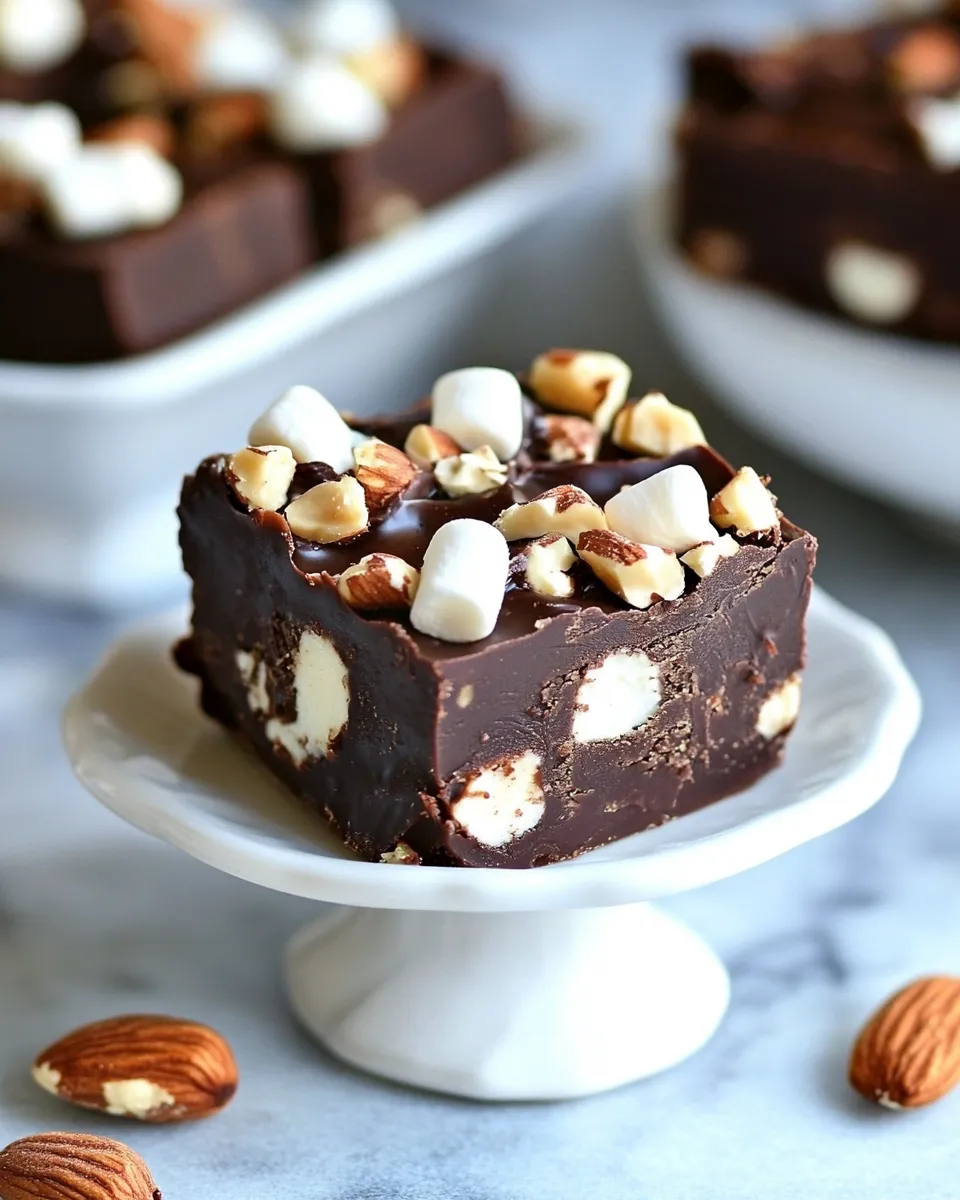
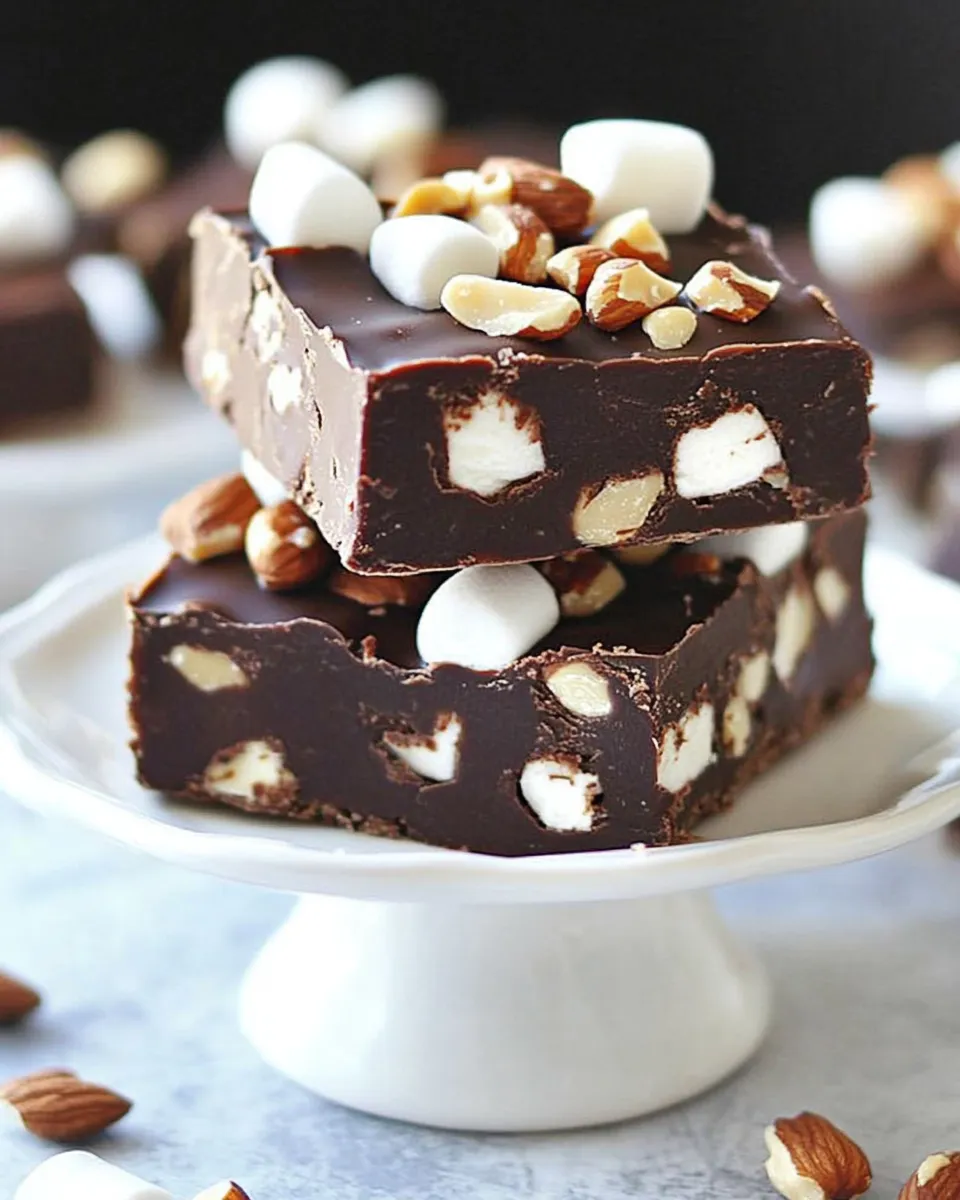
Indulge your sweet tooth with these rich and decadent Dark Chocolate Marshmallow Nut Fudge Bars, a delightful treat that combines the velvety smoothness of dark chocolate with the fluffy sweetness of marshmallows and the satisfying crunch of nuts. Perfect for any occasion, these fudge bars are incredibly easy to make and don’t require any baking, making them a go-to dessert for busy days or spontaneous gatherings. The combination of textures and flavors makes every bite a heavenly experience, and you’ll be left wondering how something so simple can be so delicious!
Top Reasons to Make Dark Chocolate Marshmallow Nut Fudge Bars

- Quick and Easy: With no baking required, these fudge bars come together in just a few simple steps.
- Deliciously Versatile: Customize them with your favorite nuts or chips for a unique twist every time.
- Perfect for Sharing: These bars are easy to slice and serve, making them a great addition to parties, potlucks, or even a cozy night in.
- Decadent Flavor: The rich dark chocolate pairs perfectly with sweet marshmallows, creating a treat that everyone will love.
- Kid-Friendly Fun: Involve the little ones in the kitchen and let them help crush the vanilla wafers or sprinkle on the marshmallows!
What You’ll Need
- 1 cup bittersweet chocolate chips or dark chocolate chips
- 1/2 cup evaporated milk
- 20 vanilla wafers, crushed
- 1/2 cup crispy rice cereal
- 3 tbsp powdered sugar
- 3/4 cup miniature marshmallows
- 1/2 cup peanut butter chips (can replace with chocolate, butterscotch, etc.)
- 1/3 cup pecans, chopped (or walnuts or almonds or any nut you like)
Kitchen Gear Checklist
- Mixing Bowl: A large bowl for combining your ingredients.
- Spatula: For mixing and spreading the fudge mixture evenly.
- 9×9-inch Baking Dish: To set the fudge bars in the fridge.
- Measuring Cups and Spoons: For precise ingredient measurements.
- Plastic Wrap: To cover the dish while the fudge sets.
Stepwise Method: Dark Chocolate Marshmallow Nut Fudge Bars
Step 1: Melt the Chocolate
Begin by melting the bittersweet chocolate chips or dark chocolate chips together with the evaporated milk in a medium saucepan over low heat. Stir continuously until the mixture is smooth and well combined. Remove from heat and let it cool slightly.
Step 2: Combine the Dry Ingredients
In a large mixing bowl, combine the crushed vanilla wafers, crispy rice cereal, and powdered sugar. Mix well to ensure that everything is evenly distributed.
Step 3: Fold in the Chocolate Mixture
Once the chocolate has cooled a bit, pour it into the bowl with the dry ingredients. Stir gently until everything is well incorporated.
Step 4: Add Marshmallows and Nuts
Carefully fold in the miniature marshmallows, peanut butter chips, and chopped nuts of your choice. Be gentle to avoid breaking the marshmallows.
Step 5: Transfer to Dish
Line your 9×9-inch baking dish with parchment paper for easy removal. Spoon the fudge mixture into the dish, spreading it out evenly using a spatula.
Step 6: Chill the Fudge
Cover the dish with plastic wrap and refrigerate for at least 2 hours, or until the fudge is firm and set.
Step 7: Cut and Serve
Once set, remove the fudge from the dish using the parchment paper. Cut into squares and serve. Enjoy your Dark Chocolate Marshmallow Nut Fudge Bars!
Adaptations for Special Diets
- Dairy-Free: Use dairy-free chocolate chips and coconut milk instead of evaporated milk.
- Nut-Free: Replace the nuts with additional crispy rice cereal or seeds like pumpkin or sunflower seeds.
- Gluten-Free: Ensure that the vanilla wafers you use are labeled gluten-free.
- Vegan: Use vegan chocolate chips and plant-based milk alternatives.
Avoid These Mistakes
- Not allowing the chocolate to cool slightly before mixing can cause the marshmallows to melt.
- Forgetting to line the baking dish can make it difficult to remove the fudge.
- Overmixing the fudge can lead to a dense texture instead of the desired fudgy consistency.
- Not refrigerating long enough can result in soft fudge that doesn’t hold its shape.
Storage Pro Tips
To keep your Dark Chocolate Marshmallow Nut Fudge Bars fresh and delicious:
- Store the fudge bars in an airtight container in the refrigerator for up to two weeks.
- For longer storage, you can freeze the bars. Wrap them individually in plastic wrap and place them in a freezer-safe container for up to three months.
- To serve frozen bars, simply let them thaw in the fridge for a few hours before enjoying.
FAQ
Can I use milk chocolate instead of dark chocolate?
Yes, you can substitute milk chocolate chips for dark chocolate chips if you prefer a sweeter taste.
How do I make these fudge bars more chocolatey?
For an extra chocolate kick, you can add chocolate chips to the mixture or drizzle melted chocolate on top before chilling.
What other nuts can I use?
You can use any nuts you like, such as walnuts, almonds, or even pecans for a delightful crunch.
Can I add other mix-ins?
Absolutely! Feel free to add dried fruits, cookie crumbs, or even crushed candies to customize your fudge bars.
Ready, Set, Cook
Get your ingredients ready and gather your kitchen gear because these Dark Chocolate Marshmallow Nut Fudge Bars are calling your name! With their rich flavor and delightful texture, they are sure to become a favorite in your dessert repertoire. Whether you’re making them for a special occasion or just to satisfy a sweet craving, these bars are the perfect blend of chocolatey goodness and marshmallowy fluff. Enjoy the process and savor every bite!
Dark Chocolate Marshmallow Nut Fudge Bars
Ingredients
Equipment
Method
- Begin by melting the bittersweet chocolate chips or dark chocolate chips together with the evaporated milk in a medium saucepan over low heat. Stir continuously until the mixture is smooth and well combined. Remove from heat and let it cool slightly.
- In a large mixing bowl, combine the crushed vanilla wafers, crispy rice cereal, and powdered sugar. Mix well to ensure that everything is evenly distributed.
- Once the chocolate has cooled a bit, pour it into the bowl with the dry ingredients. Stir gently until everything is well incorporated.
- Carefully fold in the miniature marshmallows, peanut butter chips, and chopped nuts of your choice. Be gentle to avoid breaking the marshmallows.
- Line your 9x9-inch baking dish with parchment paper for easy removal. Spoon the fudge mixture into the dish, spreading it out evenly using a spatula.
- Cover the dish with plastic wrap and refrigerate for at least 2 hours, or until the fudge is firm and set.
- Once set, remove the fudge from the dish using the parchment paper. Cut into squares and serve. Enjoy your Dark Chocolate Marshmallow Nut Fudge Bars!
Notes
- Store the fudge bars in an airtight container in the refrigerator for up to two weeks.
- For longer storage, freeze the bars wrapped in plastic wrap for up to three months.
- Let frozen bars thaw in the fridge for a few hours before serving.