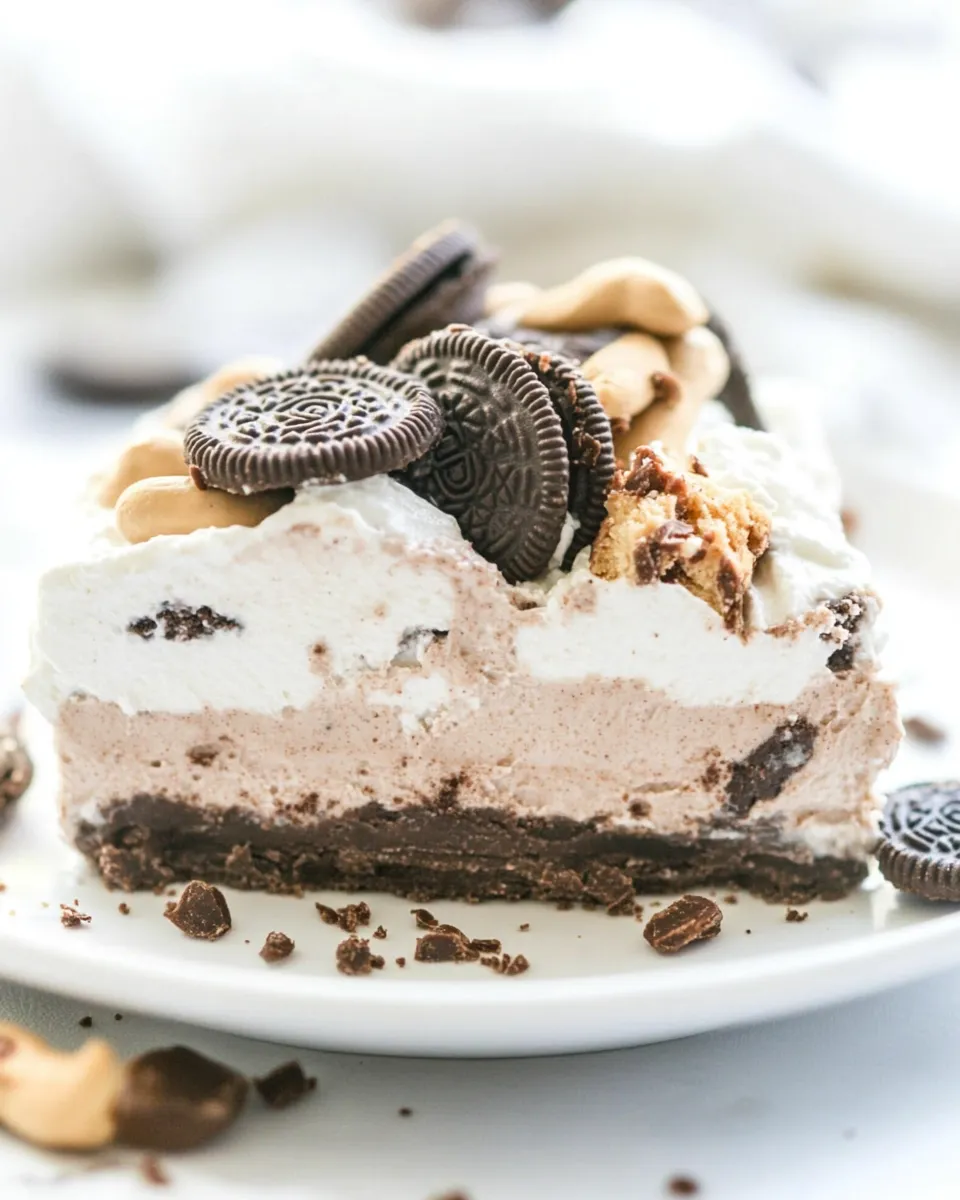
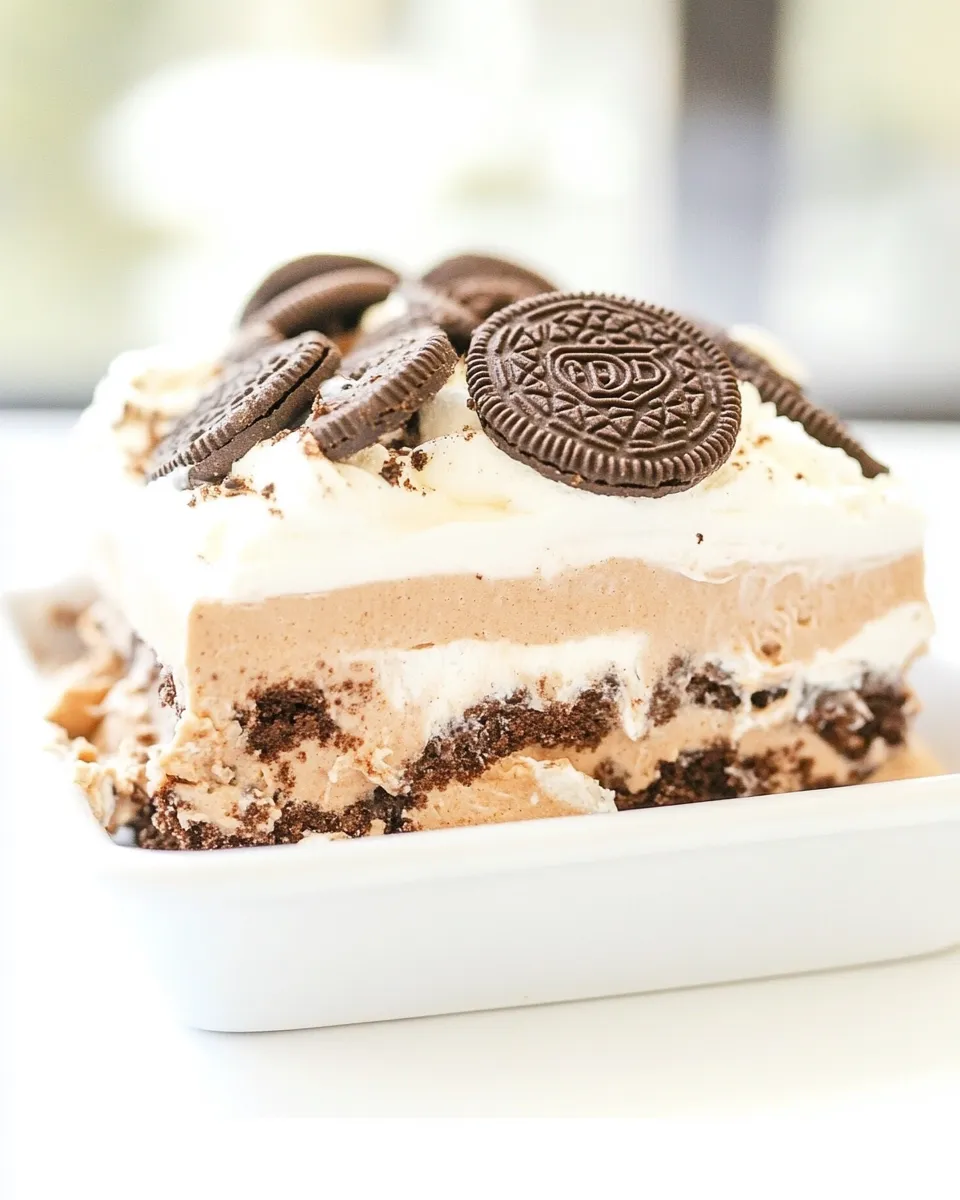
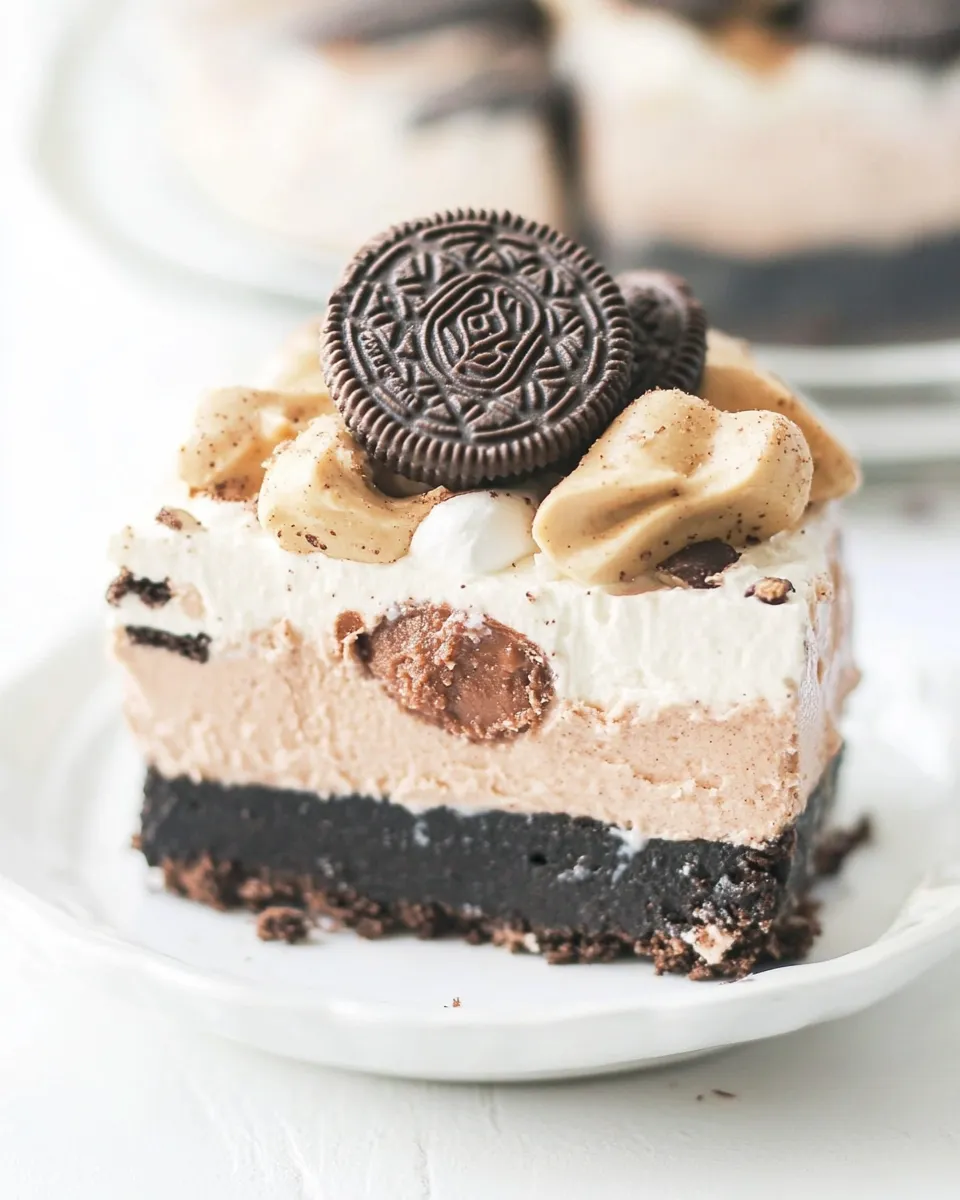
This Peanut Butter Oreo Dessert (No-Bake) is the ultimate indulgence for peanut butter lovers and cookie enthusiasts alike. A creamy, luscious filling layered with crunchy Oreos and topped with a decadent chocolate layer, this dessert is as simple to make as it is delightful to eat. No baking required, just a little mixing, and some time to chill. Perfect for parties, gatherings, or a sweet treat at home, this recipe is sure to become a favorite in your dessert repertoire.
Why It’s Crowd-Pleasing
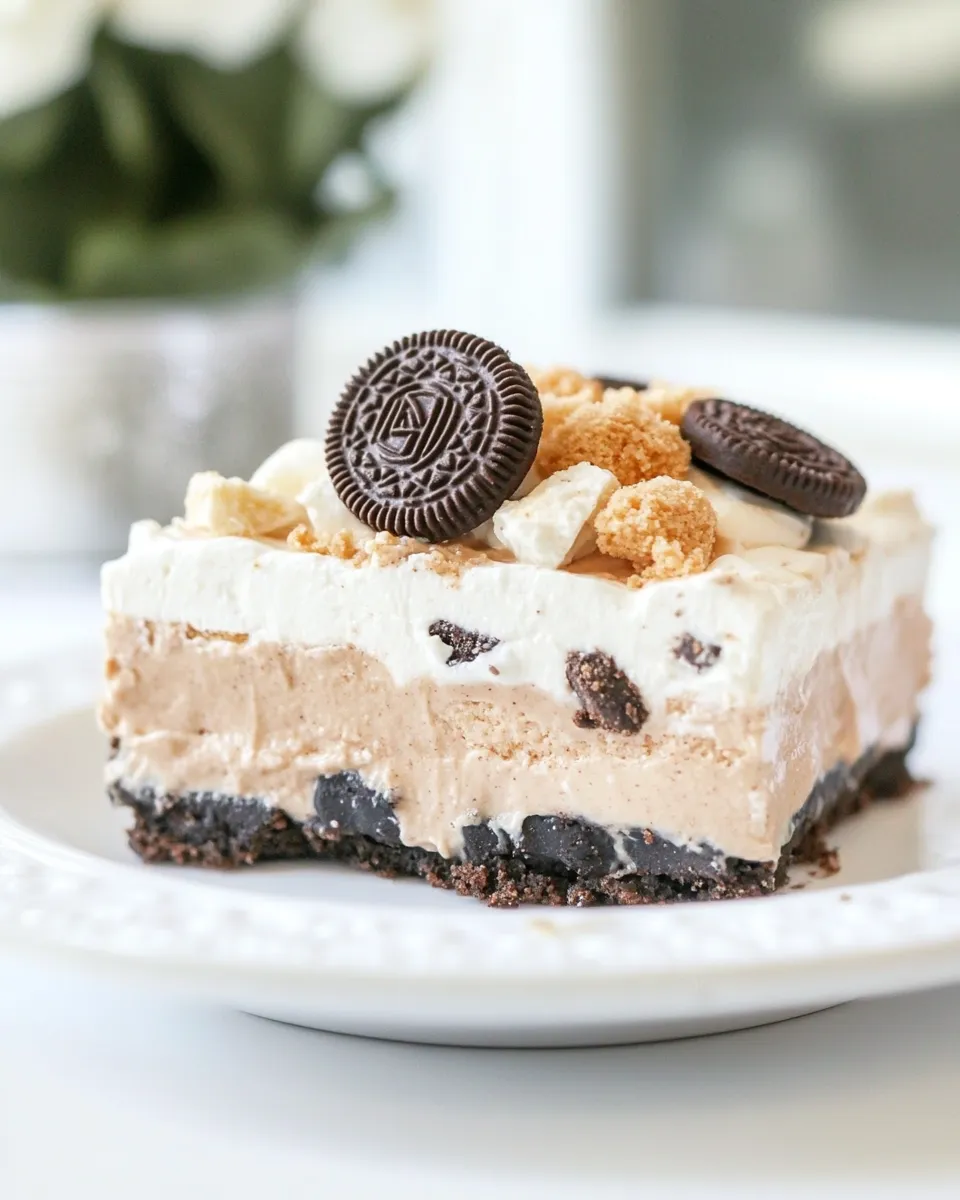
What makes this Peanut Butter Oreo Dessert (No-Bake) a hit among friends and family? It perfectly balances the rich flavors of peanut butter and chocolate with the iconic crunch of Oreos. Each bite is a harmonious blend of textures—creamy, crunchy, and oh-so-satisfying. Not only is it easy to whip up, but it also requires minimal ingredients, making it accessible for everyone, from novice bakers to seasoned pros. Plus, who can resist a dessert that brings together two beloved treats in one?
Your Shopping Guide
To create your own Peanut Butter Oreo Dessert (No-Bake), here’s what you’ll need:
- 20 Oreo cookies (divided)
- 2 tablespoons butter (softened)
- 1 package (8 ounces) cream cheese (room temperature)
- 1/2 cup peanut butter
- 1-1/2 cups confectioners’ sugar (divided)
- 1 carton (16 ounces) Cool Whip (thawed, or 4 cups homemade whipped cream)
- 10 Reese’s peanut butter cups (divided)
- 1 cup cold milk
- 1 package (3.9 ounces) instant chocolate fudge pudding mix
Before You Start: Equipment
Before diving into the recipe, make sure you have the following equipment ready:
- 9×13 inch baking dish – perfect for layering your dessert.
- Mixing bowls – for combining your ingredients smoothly.
- Electric mixer – to achieve that fluffy cream cheese mixture.
- Spoon or spatula – for spreading and layering.
- Measuring cups and spoons – to ensure accurate ingredient amounts.
Peanut Butter Oreo Dessert (No-Bake) in Steps
Step 1: Prepare the Oreo Crust
Start by crushing 15 of the Oreo cookies into fine crumbs. You can do this by placing them in a zip-top bag and using a rolling pin or pulsing them in a food processor. In a mixing bowl, combine the crushed Oreos with 2 tablespoons of softened butter. Mix until the crumbs are evenly coated and resemble wet sand.
Step 2: Create the Base Layer
Press the Oreo mixture firmly into the bottom of a 9×13 inch baking dish to form a crust. Set this aside while you prepare the filling.
Step 3: Make the Peanut Butter Filling
In a large mixing bowl, beat the cream cheese until smooth and creamy. Add in 1/2 cup of peanut butter and 1 cup of confectioners’ sugar. Mix until everything is well combined and fluffy. Gently fold in 8 ounces of Cool Whip (or your homemade whipped cream) until no streaks remain.
Step 4: Layer the Filling
Spread the peanut butter filling over the Oreo crust in the baking dish. Make sure to distribute it evenly for a uniform layer.
Step 5: Add Reese’s Peanut Butter Cups
Chop 5 of the Reese’s peanut butter cups into small pieces and sprinkle them over the peanut butter filling. This adds a delightful crunch and extra peanut butter flavor.
Step 6: Prepare the Chocolate Layer
In a separate bowl, whisk together 1 cup of cold milk and the chocolate fudge pudding mix until it thickens. Once thickened, gently fold in the remaining Cool Whip until combined.
Step 7: Top with Chocolate
Pour the chocolate pudding mixture over the peanut butter layer, spreading it evenly.
Step 8: Final Touches
Crush the remaining 5 Oreo cookies and sprinkle them over the top of the dessert for added crunch and decoration. Finally, chop the remaining Reese’s peanut butter cups and scatter them on top.
Step 9: Chill
Cover the dish with plastic wrap and refrigerate for at least 4 hours, or overnight if possible, to allow the layers to set properly.
Substitutions by Category
- Dairy Alternatives: Use vegan cream cheese and whipped topping if you’re looking for a dairy-free option.
- Sweetener Alternatives: Instead of confectioners’ sugar, you can use powdered coconut sugar or another preferred sweetener.
- Gluten-Free Options: Use gluten-free Oreo cookies to make this dessert suitable for those with gluten sensitivities.
- Nut Butter Alternatives: If peanut butter is not your thing, almond butter or sunflower seed butter can be great substitutes.
Things That Go Wrong
Sometimes, even the best recipes can go awry. Here are a few common pitfalls and how to avoid them:
- Crust Crumbling: Ensure the butter is adequately mixed with the Oreo crumbs for better binding.
- Layer Separation: Allow the filling to cool slightly before layering to prevent it from melting into the crust.
- Pudding Not Setting: Make sure to whisk the pudding mix thoroughly with cold milk until it thickens.
Keep-It-Fresh Plan
To keep your Peanut Butter Oreo Dessert (No-Bake) fresh:
- Store leftovers in an airtight container in the refrigerator for up to 3 days.
- For best results, consume within the first 24-48 hours for optimal texture.
- If you want to prepare it ahead of time, assemble the dessert but wait to add the toppings until just before serving.
Reader Q&A
Can I use regular whipped cream instead of Cool Whip?
Absolutely! If you prefer homemade whipped cream, just whip up 4 cups of heavy cream with some sugar until stiff peaks form and use it in place of Cool Whip.
How do I make this dessert more chocolatey?
You can mix in chocolate chips into the peanut butter filling or use chocolate Oreos for the crust to enhance the chocolate flavor.
Can I freeze the Peanut Butter Oreo Dessert?
Yes, this dessert can be frozen! Just make sure to cover it well. When ready to serve, thaw it in the refrigerator overnight.
What can I substitute for the Reese’s cups?
If Reese’s cups are not available, you can use any chocolate and peanut butter candy, or simply omit them for a straightforward peanut butter and Oreo flavor.
If you enjoyed this , you might also love these delicious treats:
The Last Word
This Peanut Butter Oreo Dessert (No-Bake) is not just a treat; it’s a celebration of flavors that brings joy to any gathering. With its effortless preparation and mouthwatering taste, it’s a dessert that promises smiles and satisfied cravings. Whether you’re serving it at a birthday party, a picnic, or simply indulging at home, this dessert will not disappoint. Get ready to dive into layers of creamy peanut butter, crunchy Oreos, and rich chocolate—your taste buds will thank you!
Peanut Butter Oreo Dessert (No-Bake)
Ingredients
Equipment
Method
- Start by crushing 15 of the Oreo cookies into fine crumbs. You can do this by placing them in a zip-top bag and using a rolling pin or pulsing them in a food processor. In a mixing bowl, combine the crushed Oreos with 2 tablespoons of softened butter. Mix until the crumbs are evenly coated and resemble wet sand.
- Press the Oreo mixture firmly into the bottom of a 9x13 inch baking dish to form a crust. Set this aside while you prepare the filling.
- In a large mixing bowl, beat the cream cheese until smooth and creamy. Add in 1/2 cup of peanut butter and 1 cup of confectioners' sugar. Mix until everything is well combined and fluffy. Gently fold in 8 ounces of Cool Whip until no streaks remain.
- Spread the peanut butter filling over the Oreo crust in the baking dish. Make sure to distribute it evenly for a uniform layer.
- Chop 5 of the Reese's peanut butter cups into small pieces and sprinkle them over the peanut butter filling. This adds a delightful crunch and extra peanut butter flavor.
- In a separate bowl, whisk together 1 cup of cold milk and the chocolate fudge pudding mix until it thickens. Once thickened, gently fold in the remaining Cool Whip until combined.
- Pour the chocolate pudding mixture over the peanut butter layer, spreading it evenly.
- Crush the remaining 5 Oreo cookies and sprinkle them over the top of the dessert for added crunch and decoration. Finally, chop the remaining Reese's peanut butter cups and scatter them on top.
- Cover the dish with plastic wrap and refrigerate for at least 4 hours, or overnight if possible, to allow the layers to set properly.
Notes
- Store leftovers in an airtight container in the refrigerator for up to 3 days.
- For best results, consume within the first 24-48 hours for optimal texture.
- If you want to prepare it ahead of time, assemble the dessert but wait to add the toppings until just before serving.