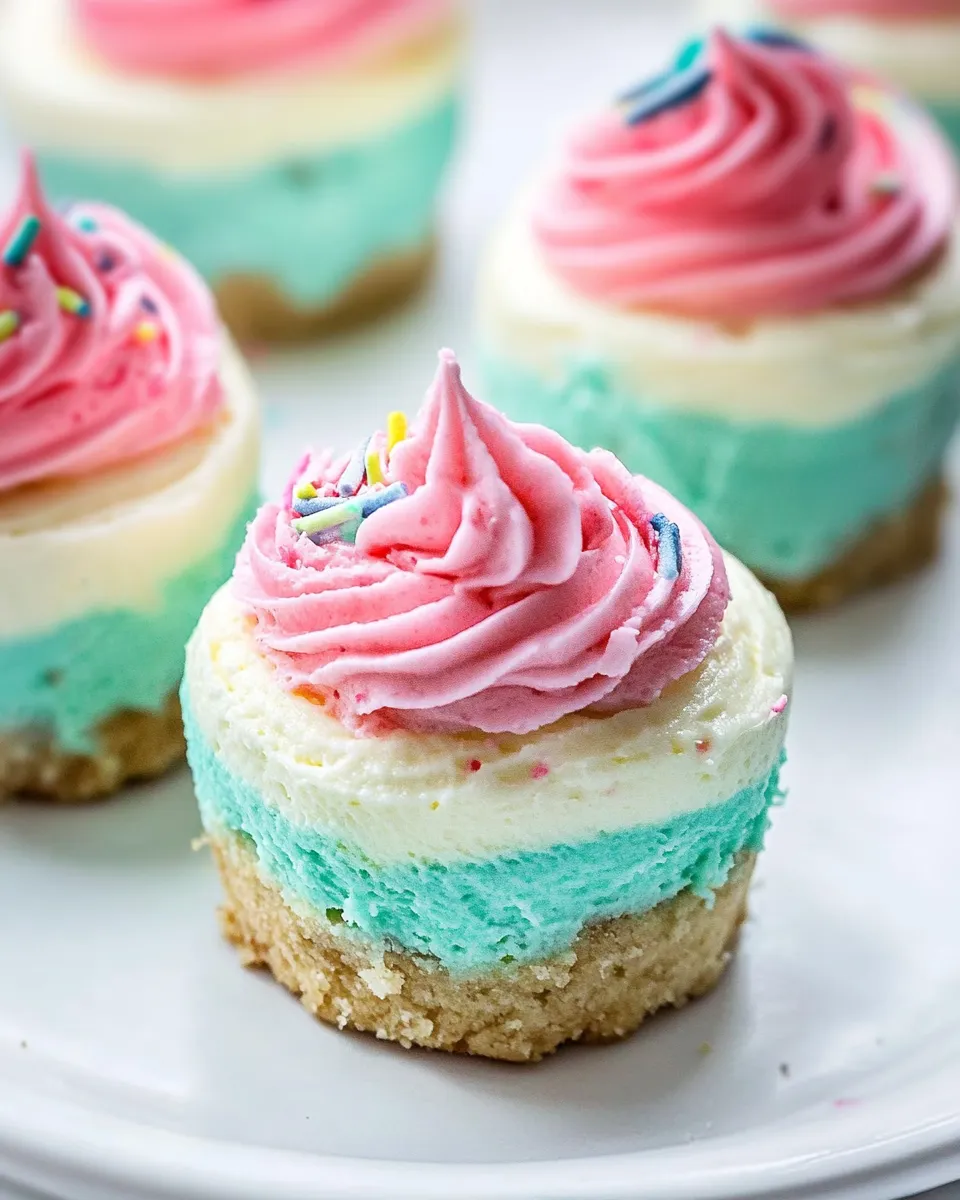
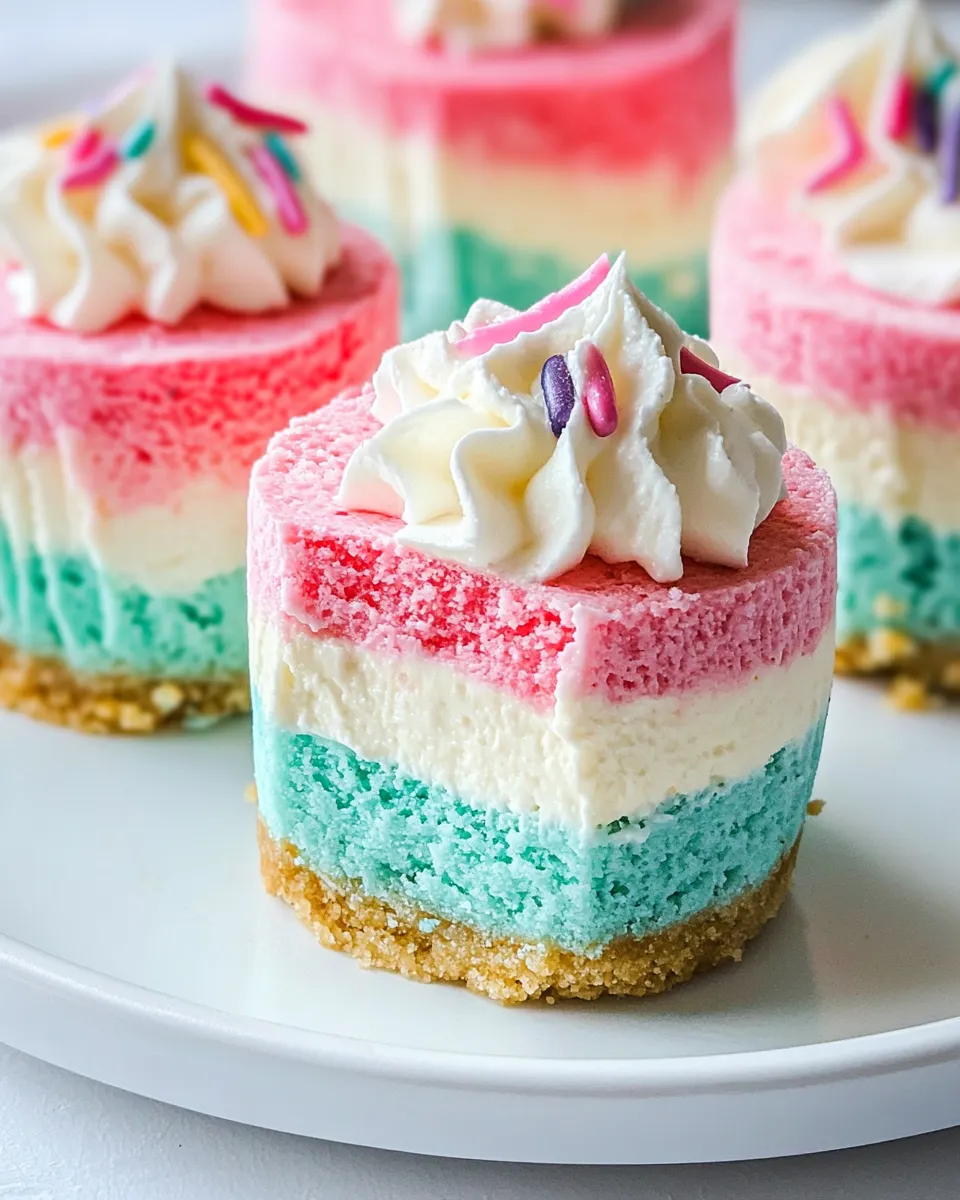
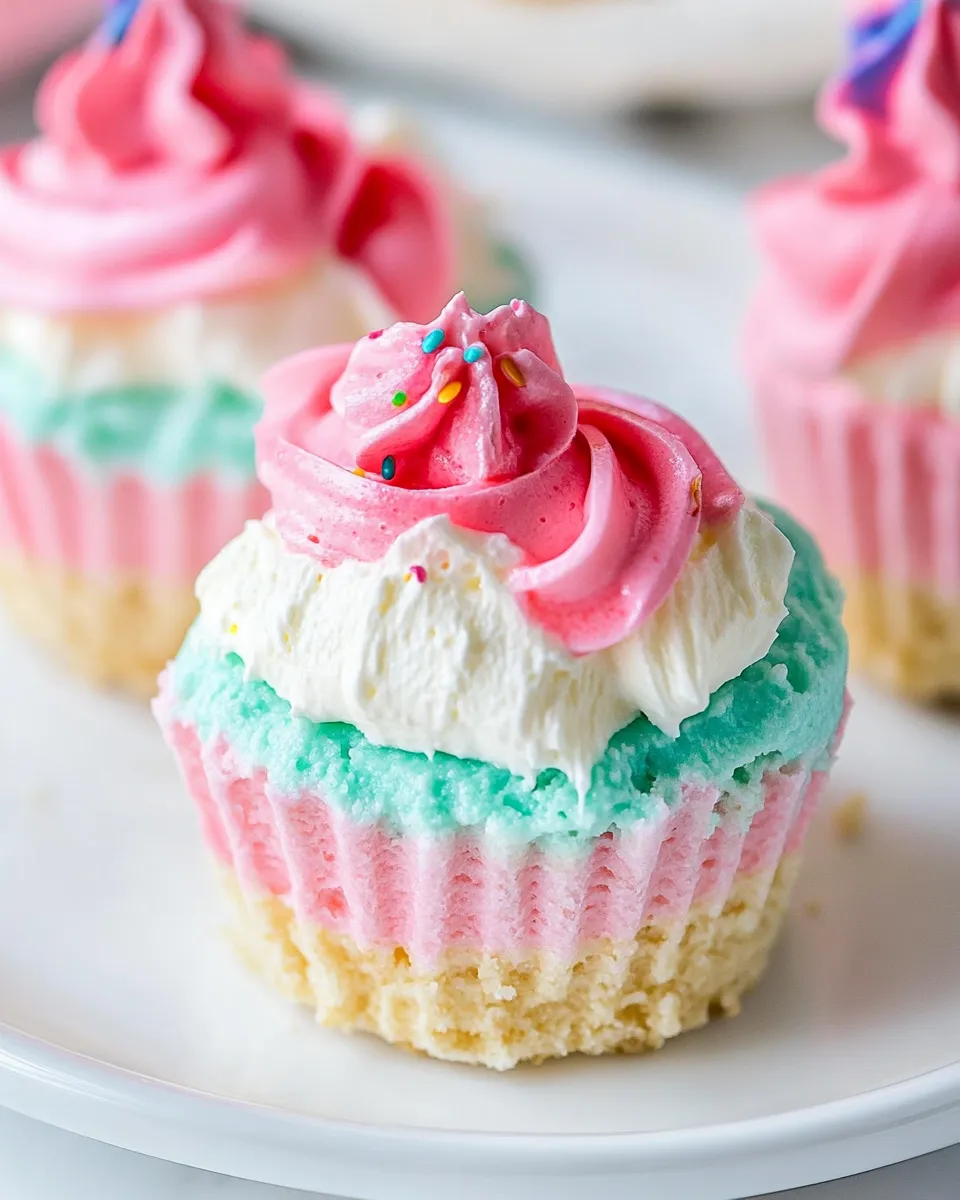
If you’re looking for a fun and whimsical dessert that’s perfect for any celebration, look no further than these Small-batch No-bake Unicorn Cheesecakes. With their vibrant colors and creamy texture, these little treats are sure to be a hit with both kids and adults alike. Plus, they’re incredibly easy to make with just a handful of ingredients and a handheld electric mixer. Let’s dive into this magical recipe!
Why It Works Every Time
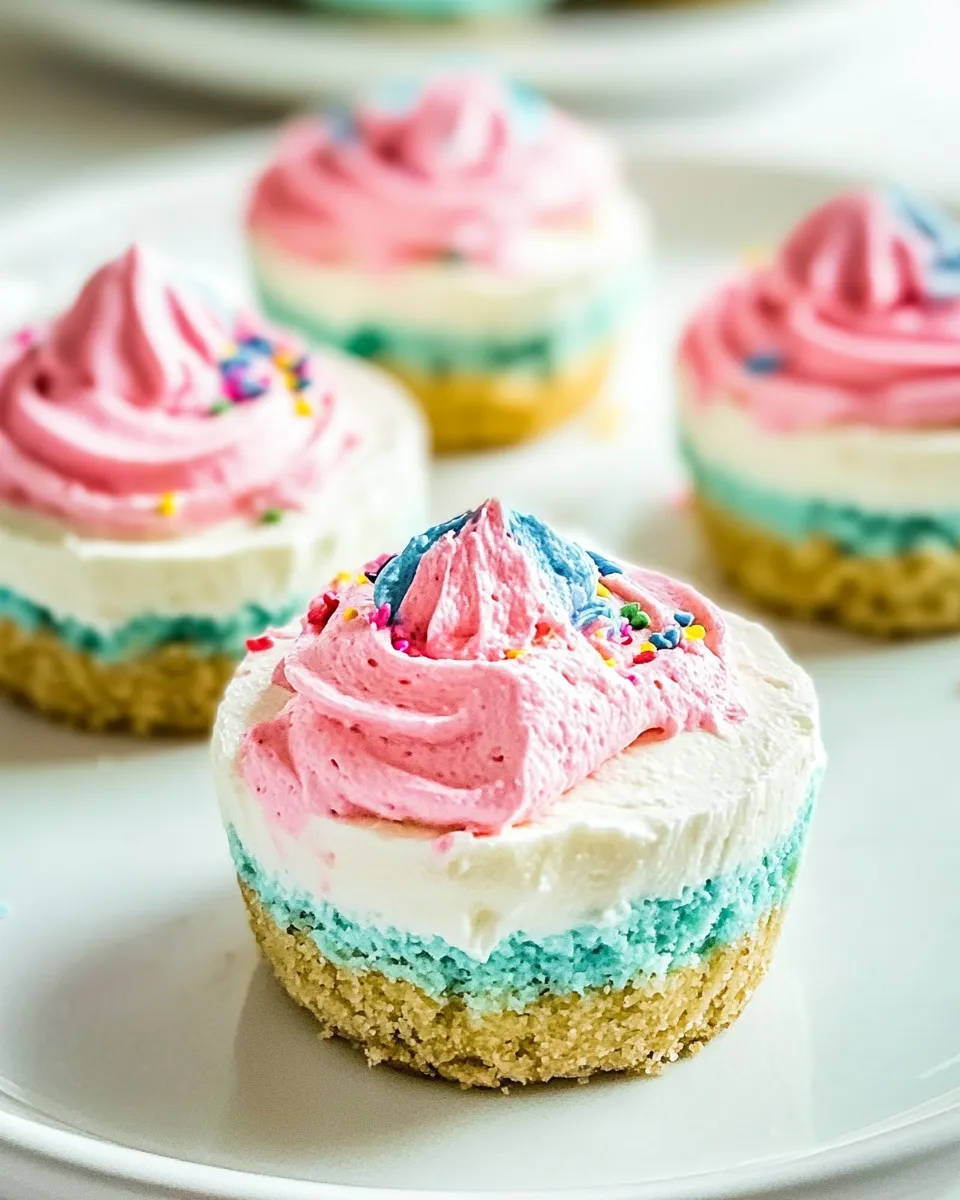
The beauty of these Small-batch No-bake Unicorn Cheesecakes lies in their simplicity and adaptability. By using a handheld electric mixer, you can achieve a smooth and creamy cheesecake filling without the need for complicated equipment. The combination of cream cheese, heavy cream, and sugar creates a rich and luscious texture, while the graham cracker crust adds a delightful crunch. The no-bake aspect makes them incredibly convenient, allowing you to whip them up even on a busy day. Plus, the vibrant colors make them visually appealing, turning any gathering into a special occasion!
Gather These Ingredients
Before you get started, make sure you have the following ingredients on hand:
- 4 foil cupcake liners* – for the perfect serving size
- 1/2 cup graham cracker crumbs (about 3 full graham cracker sheets) – for a crunchy crust
- 1 heaping tablespoon (16g) brown sugar – to sweeten the crust
- 3 tablespoons (1.5oz) butter, melted – to bind the crust
- 1/4 cup heavy cream – for a rich cheesecake filling
- 5 ounces cream cheese, softened – the base of the cheesecake
- 3 heaping tablespoons (42g) granulated sugar – to sweeten the filling
- 1/2 teaspoon vanilla extract – for flavor
- Blue food coloring – for that magical touch
- Red food coloring – to create vibrant layers
- Whipped cream – for topping
- Sprinkles – to add a festive finish
Setup & Equipment
You’ll need a few simple tools to make your cheesecake experience seamless:
- Handheld electric mixer – for mixing the cheesecake filling
- Mixing bowls – to combine your ingredients
- Measuring cups and spoons – for accurate measurements
- Rubber spatula – for scraping down the sides of the bowl
- Cookie scoop or spoon – for portioning the filling into the cupcake liners
Small-batch No-bake Unicorn Cheesecakes: Step-by-Step Guide
Let’s get started on creating these delightful Small-batch No-bake Unicorn Cheesecakes!
Step 1: Prepare the Crust
In a mixing bowl, combine the graham cracker crumbs, brown sugar, and melted butter. Stir until the mixture resembles wet sand.
Step 2: Form the Crust
Line your cupcake pan with foil cupcake liners. Evenly distribute the crust mixture into each liner. Press down firmly with the back of a spoon to form a solid base.
Step 3: Make the Cheesecake Filling
In a large mixing bowl, add the softened cream cheese, granulated sugar, and vanilla extract. Using your handheld electric mixer, beat until smooth and creamy.
Step 4: Whip the Cream
In a separate bowl, whip the heavy cream until stiff peaks form. This will give your cheesecake a light and airy texture.
Step 5: Combine the Mixtures
Gently fold the whipped cream into the cream cheese mixture using a rubber spatula. Be careful not to deflate the whipped cream too much.
Step 6: Color the Filling
Divide the cheesecake filling into two bowls. Add a few drops of blue food coloring to one bowl and red food coloring to the other. Stir until you achieve your desired shades.
Step 7: Layer the Filling
Using a cookie scoop or spoon, layer the blue and red cheesecake filling into the prepared crusts. Alternate between colors to create a beautiful swirled effect.
Step 8: Chill
Place the cupcakes in the refrigerator for at least 2 hours, or until set.
Step 9: Top and Serve
Once set, top each cheesecake with a generous dollop of whipped cream and sprinkle with colorful sprinkles.
Nutrition-Minded Tweaks
If you’re looking to make these Small-batch No-bake Unicorn Cheesecakes a bit healthier, consider these options:
- Use low-fat cream cheese – to reduce calories while maintaining creaminess.
- Substitute coconut cream for heavy cream for a dairy-free option.
- Use natural sweeteners – like honey or maple syrup instead of granulated sugar.
- Incorporate fruit purees for added flavor and natural sweetness.
Don’t Do This
Creating the perfect Small-batch No-bake Unicorn Cheesecakes is easy, but there are a few common pitfalls to avoid:
- Don’t rush the chilling process. Allowing the cheesecakes to set properly ensures the right texture.
- Avoid overmixing the whipped cream into the cheesecake mixture, as this can deflate the airy texture.
- Don’t skip the foil liners; they help maintain the shape and make for easy serving.
- Steer clear of using cold cream cheese directly from the fridge; it should be softened for a smooth filling.
Keep It Fresh: Storage Guide
These Small-batch No-bake Unicorn Cheesecakes can be stored easily:
Keep them in the refrigerator in an airtight container for up to 3 days. If you want to make them ahead of time, they can be prepared a day in advance. Just add the whipped cream and sprinkles right before serving to keep them looking fresh and vibrant.
Your Questions, Answered
Can I use a different type of crust?
Absolutely! Feel free to experiment with other crusts, such as crushed Oreos or gluten-free cookies, to suit your dietary preferences.
How can I make these cheesecakes dairy-free?
You can substitute cream cheese with a dairy-free alternative and use coconut cream for the heavy cream. Just ensure all other ingredients are dairy-free as well.
Can I freeze these cheesecakes?
Yes, you can freeze them! Just make sure they are properly sealed in an airtight container. Thaw them in the refrigerator before serving.
What’s the best way to serve these cheesecakes?
These cheesecakes are best served chilled, topped with whipped cream and sprinkles. You can also garnish with fresh fruit or chocolate shavings for extra flair!
If you enjoyed these , you might also love these delightful treats:
Before You Go
These Small-batch No-bake Unicorn Cheesecakes are not only a feast for the eyes but also a delicious treat that’s easy to whip up. Perfect for birthdays, celebrations, or just a fun dessert night at home, they are sure to bring smiles all around. So gather your ingredients, unleash your inner unicorn, and enjoy these delightful cheesecakes!
Small-batch No-bake Unicorn Cheesecakes
Ingredients
Equipment
Method
- Step 1: Prepare the Crust - In a mixing bowl, combine the graham cracker crumbs, brown sugar, and melted butter. Stir until the mixture resembles wet sand.
- Step 2: Form the Crust - Line your cupcake pan with foil cupcake liners. Evenly distribute the crust mixture into each liner. Press down firmly with the back of a spoon to form a solid base.
- Step 3: Make the Cheesecake Filling - In a large mixing bowl, add the softened cream cheese, granulated sugar, and vanilla extract. Using your handheld electric mixer, beat until smooth and creamy.
- Step 4: Whip the Cream - In a separate bowl, whip the heavy cream until stiff peaks form. This will give your cheesecake a light and airy texture.
- Step 5: Combine the Mixtures - Gently fold the whipped cream into the cream cheese mixture using a rubber spatula. Be careful not to deflate the whipped cream too much.
- Step 6: Color the Filling - Divide the cheesecake filling into two bowls. Add a few drops of blue food coloring to one bowl and red food coloring to the other. Stir until you achieve your desired shades.
- Step 7: Layer the Filling - Using a cookie scoop or spoon, layer the blue and red cheesecake filling into the prepared crusts. Alternate between colors to create a beautiful swirled effect.
- Step 8: Chill - Place the cupcakes in the refrigerator for at least 2 hours, or until set.
- Step 9: Top and Serve - Once set, top each cheesecake with a generous dollop of whipped cream and sprinkle with colorful sprinkles.
Notes
- Allow enough time for the cheesecakes to chill to ensure the right texture.
- Using softened cream cheese will help achieve a smooth filling.
- Experiment with different food colorings for unique designs!