Is there anything more delightful than a dessert that’s not only delicious but also visually stunning? This Berry Cheesecake Flag Dessert is the perfect way to celebrate any occasion, especially during summer gatherings or patriotic holidays. With its vibrant layers of cream cheese filling and fresh berries, it’s a festive treat that will wow your guests and leave everyone asking for seconds. The buttery crust made from flour and butter adds a rich foundation to the creamy filling, while the berries provide a refreshing burst of flavor. Let’s dive into this delightful recipe that’s sure to be a crowd-pleaser!
Why This Berry Cheesecake Flag Dessert Stands Out
This dessert is more than just a feast for the eyes; it’s a combination of textures and flavors that will have you coming back for more. The creamy cheesecake layer pairs perfectly with the tartness of the berries, creating a harmonious balance that is both satisfying and refreshing. The flag design not only showcases your creativity but also makes it a fun centerpiece for any gathering. Whether you’re celebrating Independence Day, a birthday, or just a sunny weekend picnic, this Berry Cheesecake Flag Dessert will impress everyone at the table.
Ingredients at a Glance
To make this Berry Cheesecake Flag Dessert, you will need the following ingredients:
- 2 cups all-purpose flour
- 1/3 cup granulated sugar
- 1 cup cold butter (2 sticks)
- 2 cups cream cheese, softened
- 1 cup powdered sugar
- 1 teaspoon vanilla extract
- 2 cups mixed berries (strawberries, blueberries, raspberries)
These simple ingredients come together to create a dessert that’s not only beautiful but also incredibly delicious.
Kitchen Gear Checklist
Before you start making your Berry Cheesecake Flag Dessert, gather the following kitchen items:
- 9×13-inch baking dish – for assembling the dessert
- Mixing bowls – for combining the crust and filling
- Electric mixer – to whip the cream cheese and sugar
- Spatula – for smoothing the cheesecake layer
- Measuring cups and spoons – for accurate measurements
Having these tools ready will streamline your baking process, making it even more enjoyable.
Build Berry Cheesecake Flag Dessert Step by Step
Step 1: Prepare the Crust
In a large mixing bowl, combine the 2 cups of flour and 1/3 cup of granulated sugar. Cut in the 1 cup of cold butter using a pastry cutter or your fingers until the mixture resembles coarse crumbs. Press this mixture into the bottom of your 9×13-inch baking dish to form an even layer.
Step 2: Bake the Crust
Preheat your oven to 350°F (175°C). Bake the crust for 15-20 minutes or until it is lightly golden. Remove from the oven and allow it to cool completely.
Step 3: Make the Cream Cheese Filling
In a mixing bowl, beat together the 2 cups of softened cream cheese, 1 cup of powdered sugar, and 1 teaspoon of vanilla extract until smooth and creamy. This will create a luscious filling that complements the crust perfectly.
Step 4: Assemble the Dessert
Once the crust has cooled, spread the cream cheese filling evenly over the crust. Smooth the top with a spatula to ensure an even layer.
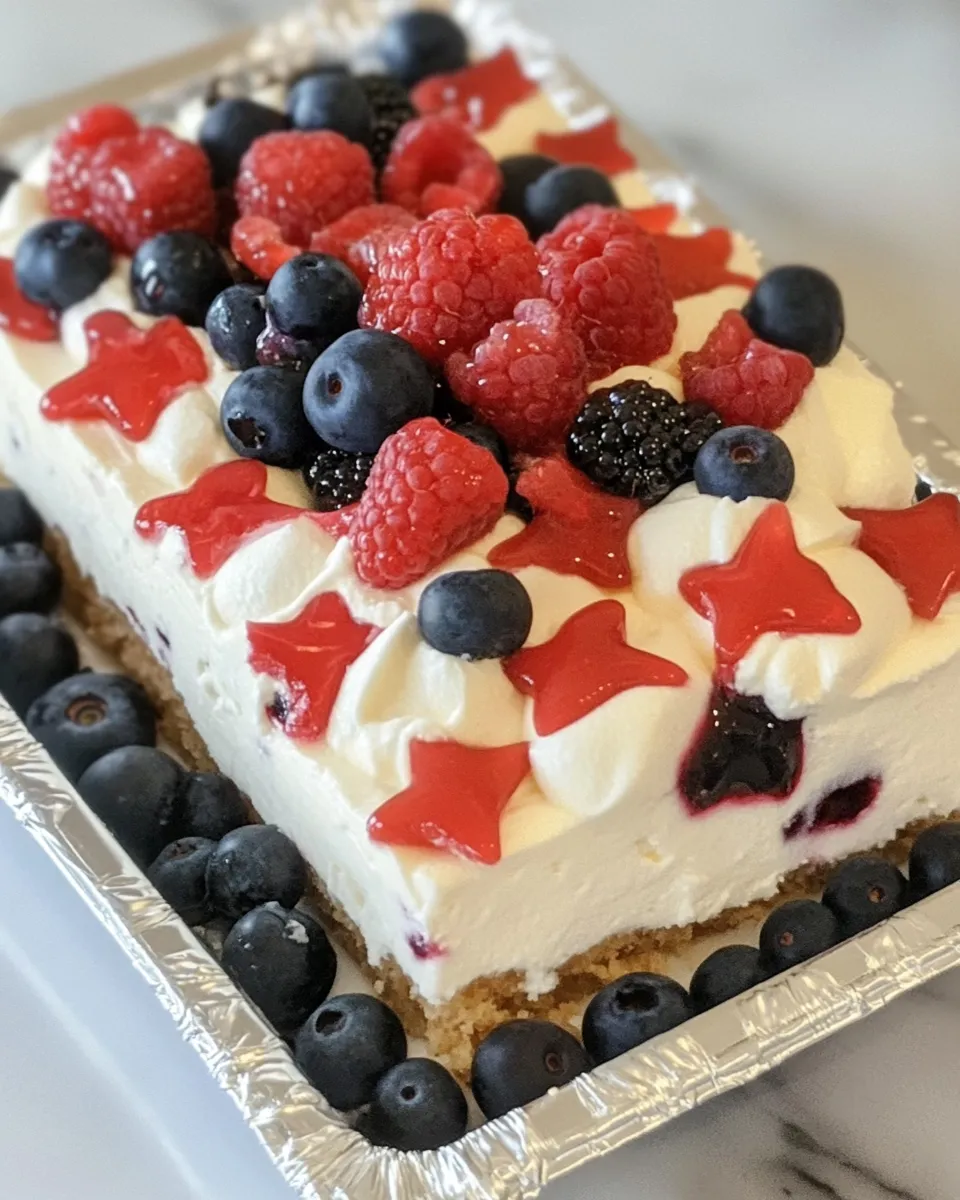
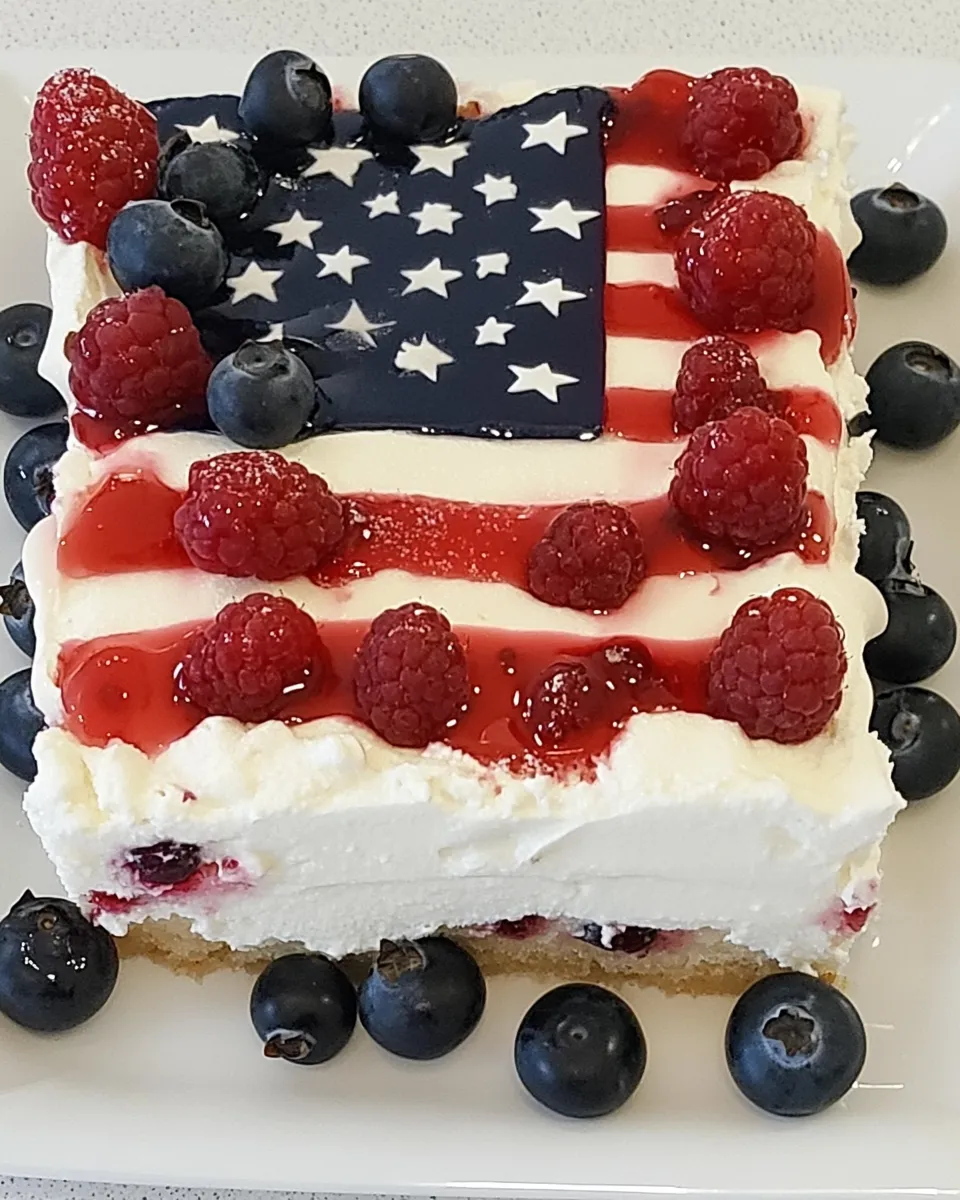
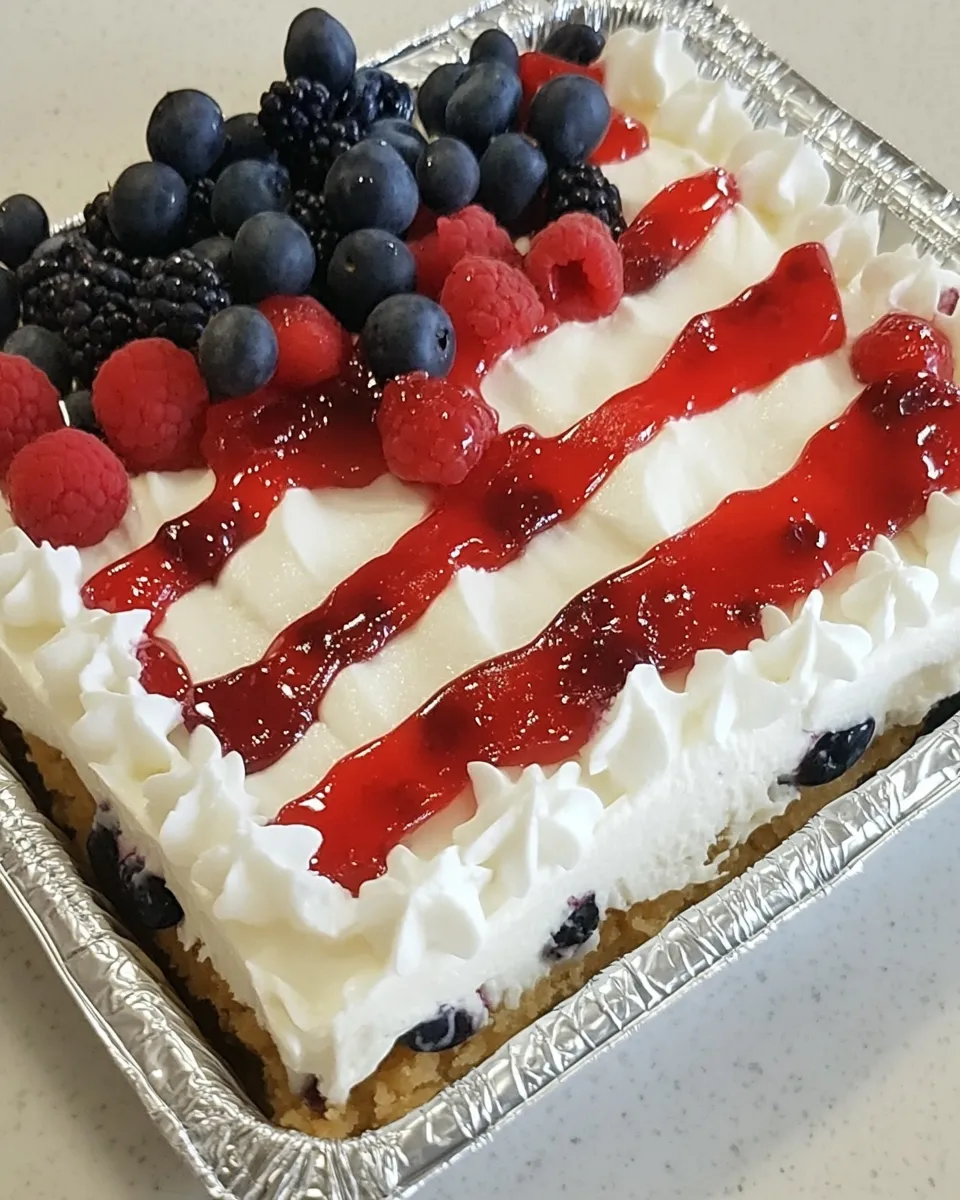
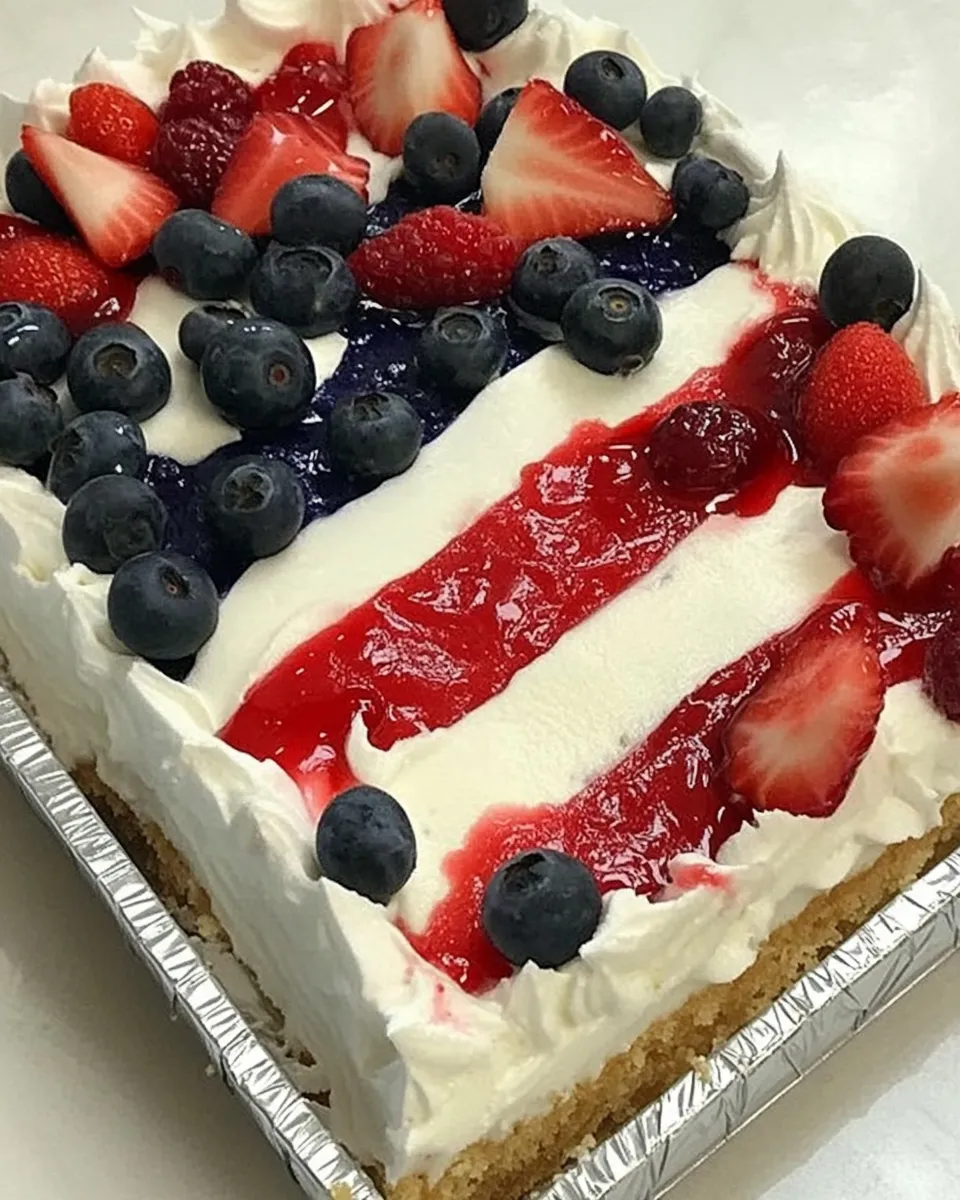
Step 5: Decorate with Berries
Now comes the fun part! Arrange your mixed berries on top of the cheesecake layer to create a flag design. Use blueberries for the star section and strawberries for the stripes, making it festive and eye-catching.
Step 6: Chill Before Serving
Refrigerate the assembled dessert for at least 4 hours, allowing the flavors to meld and the filling to firm up. This step is essential for achieving the perfect slice.
Make It Your Way
This Berry Cheesecake Flag Dessert is versatile, allowing you to modify it according to your taste preferences:
- Use different fruits: Swap out the mixed berries for your favorite seasonal fruits like peaches or cherries.
- Add a layer of chocolate: Drizzle melted chocolate over the cream cheese layer before adding the berries for a decadent twist.
- Make it gluten-free: Substitute the all-purpose flour with a gluten-free blend to cater to dietary needs.
- Try flavored cream cheese: Use flavored cream cheese, like strawberry or blueberry, for an additional layer of flavor.
Feel free to get creative with your decorations and flavors!
Things That Go Wrong
Even the best bakers encounter hiccups along the way. Here are some common issues and how to avoid them:
- Crust is too crumbly: Make sure the butter is cold and well-incorporated into the flour mixture. If it’s too dry, add a tablespoon of cold water to help it bind.
- Cheesecake layer is too runny: Ensure the cream cheese is properly softened and mixed thoroughly. Chilling the dessert for long enough is crucial to set the filling.
- Berries bleed into the filling: If you’re concerned about this, consider placing a layer of whipped cream over the cheesecake before adding the berries to act as a barrier.
With a little attention to detail, you can avoid these pitfalls and create a stunning dessert!
Keep-It-Fresh Plan
To maintain the freshness of your Berry Cheesecake Flag Dessert, follow these tips:
- Store in the refrigerator: This dessert is best served chilled, so keep it in the fridge until ready to serve.
- Cover well: Use plastic wrap or aluminum foil to cover the dessert to prevent it from absorbing any odors from the fridge.
- Consume within 3-4 days: For the best flavor and texture, enjoy this dessert within a few days of making it.
Following these guidelines will ensure that your dessert stays delicious for as long as possible!
Ask the Chef
Can I make this dessert in advance?
Absolutely! This Berry Cheesecake Flag Dessert can be made a day ahead of time. Just be sure to keep it refrigerated until serving.
What if I don’t have mixed berries?
No problem! You can use any single type of berry, such as just strawberries or just blueberries, depending on what you have on hand.
Can I freeze this dessert?
While it’s best enjoyed fresh, you can freeze the cheesecake layer without the berries for up to two months. Just thaw it in the fridge before serving and add the berries afterward.
What can I serve with this dessert?
This dessert pairs wonderfully with a dollop of whipped cream or a scoop of vanilla ice cream for an extra treat.
If you enjoyed this Berry Cheesecake Flag Dessert, you might want to check out these delightful recipes:
Bring It to the Table
Presenting your Berry Cheesecake Flag Dessert is just as important as making it. Consider serving it on a festive platter, garnished with additional fresh berries and mint leaves for a pop of color. This dessert not only tastes amazing but also looks incredible, making it the highlight of any gathering.
The combination of sweet and tangy flavors, along with the creamy texture, will leave your guests raving about your culinary skills. So grab your ingredients, gather your friends and family, and get ready to indulge in this stunning Berry Cheesecake Flag Dessert that will surely become a beloved staple in your dessert repertoire.
Berry Cheesecake Flag Dessert
Ingredients
Equipment
Method
- In a large mixing bowl, combine the 2 cups of flour and 1/3 cup of granulated sugar. Cut in the 1 cup of cold butter using a pastry cutter or your fingers until the mixture resembles coarse crumbs. Press this mixture into the bottom of your 9x13-inch baking dish to form an even layer.
- Preheat your oven to 350°F (175°C). Bake the crust for 15-20 minutes or until it is lightly golden. Remove from the oven and allow it to cool completely.
- In a mixing bowl, beat together the 2 cups of softened cream cheese, 1 cup of powdered sugar, and 1 teaspoon of vanilla extract until smooth and creamy.
- Once the crust has cooled, spread the cream cheese filling evenly over the crust. Smooth the top with a spatula.
- Arrange your mixed berries on top of the cheesecake layer to create a flag design, using blueberries for the star section and strawberries for the stripes.
- Refrigerate the assembled dessert for at least 4 hours before serving.
Notes
- Store in the refrigerator and cover well to keep it fresh.
- Consume within 3-4 days for best flavor and texture.
- Feel free to swap out the berries for your favorite seasonal fruits.