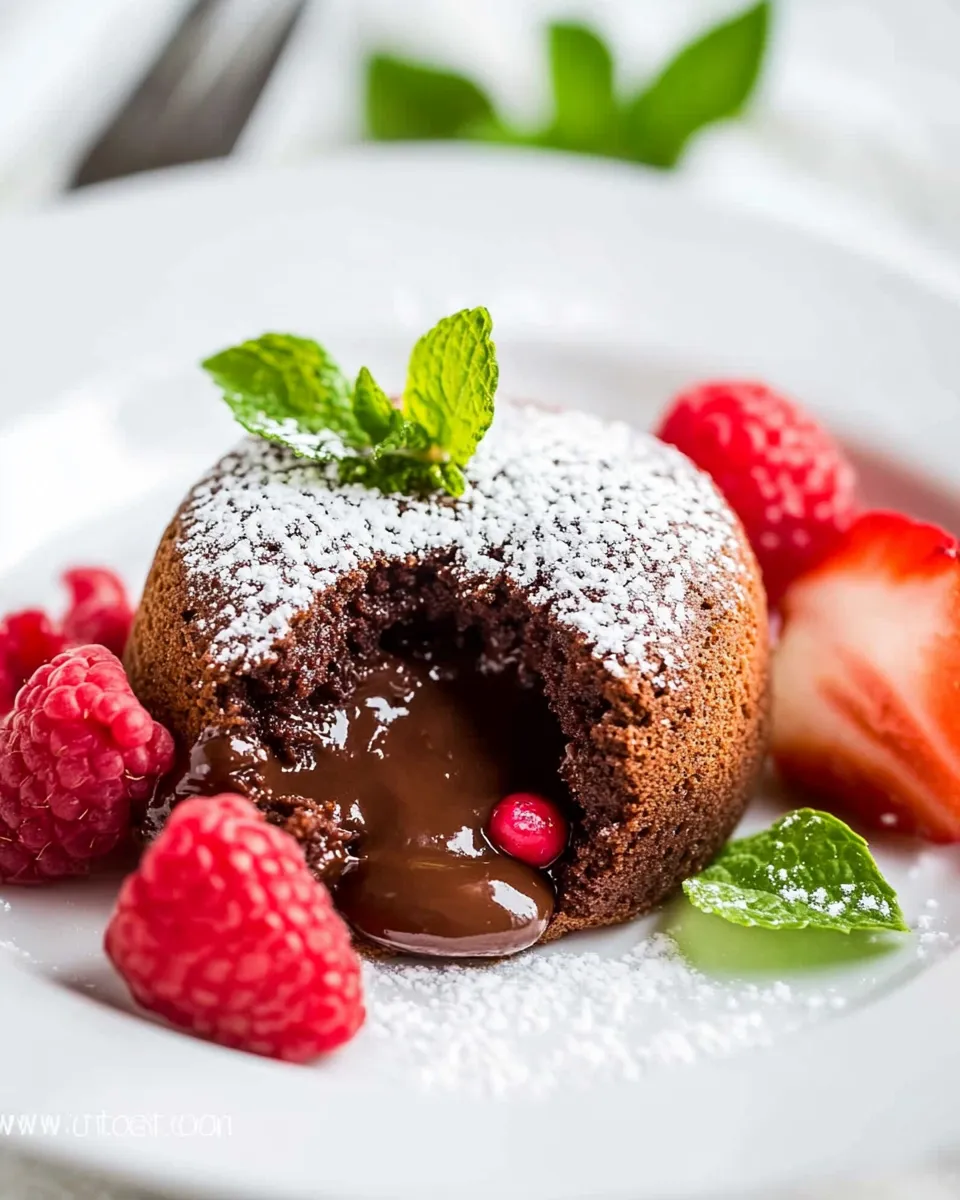
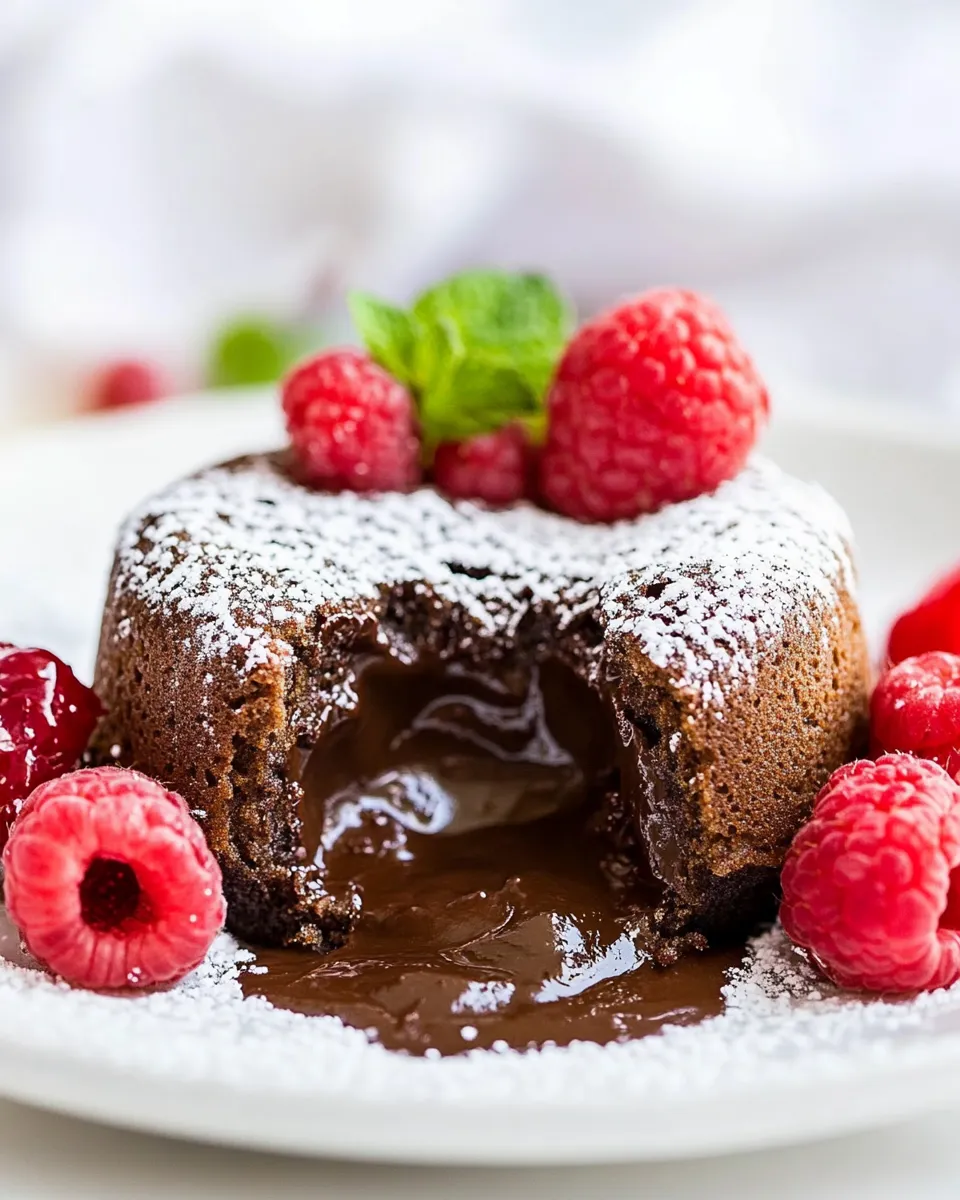
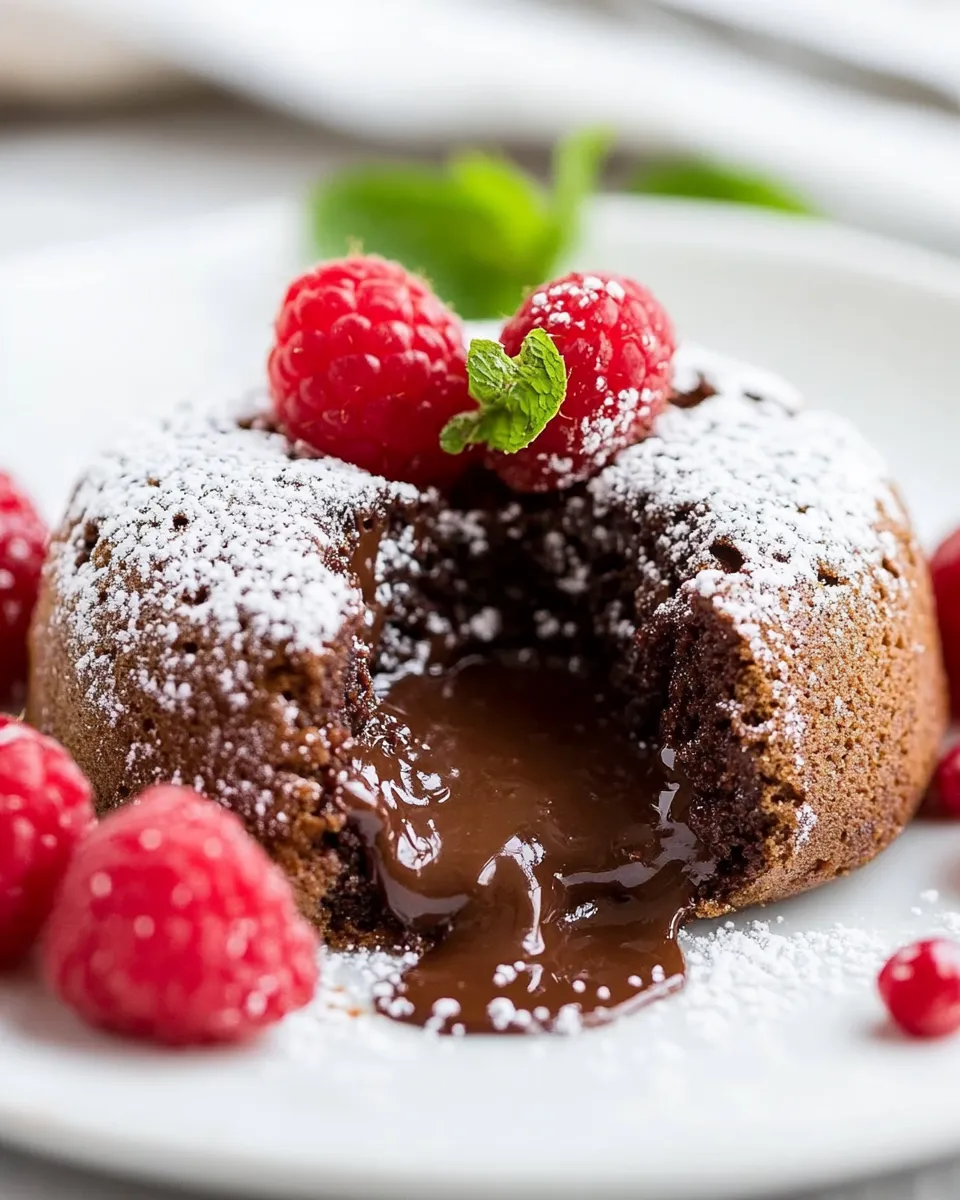
There’s nothing quite like the thrill of cutting into a perfectly baked Molten Chocolate Lava Cake. As the warm, gooey chocolate flows out, it’s a moment of pure indulgence that feels both luxurious and comforting. This dessert is a showstopper, whether you’re impressing guests at a dinner party or treating yourself after a long day. With a few simple ingredients and some careful attention to timing, you can create these delightful cakes that are sure to satisfy any chocolate lover’s cravings.
Why It Works Every Time
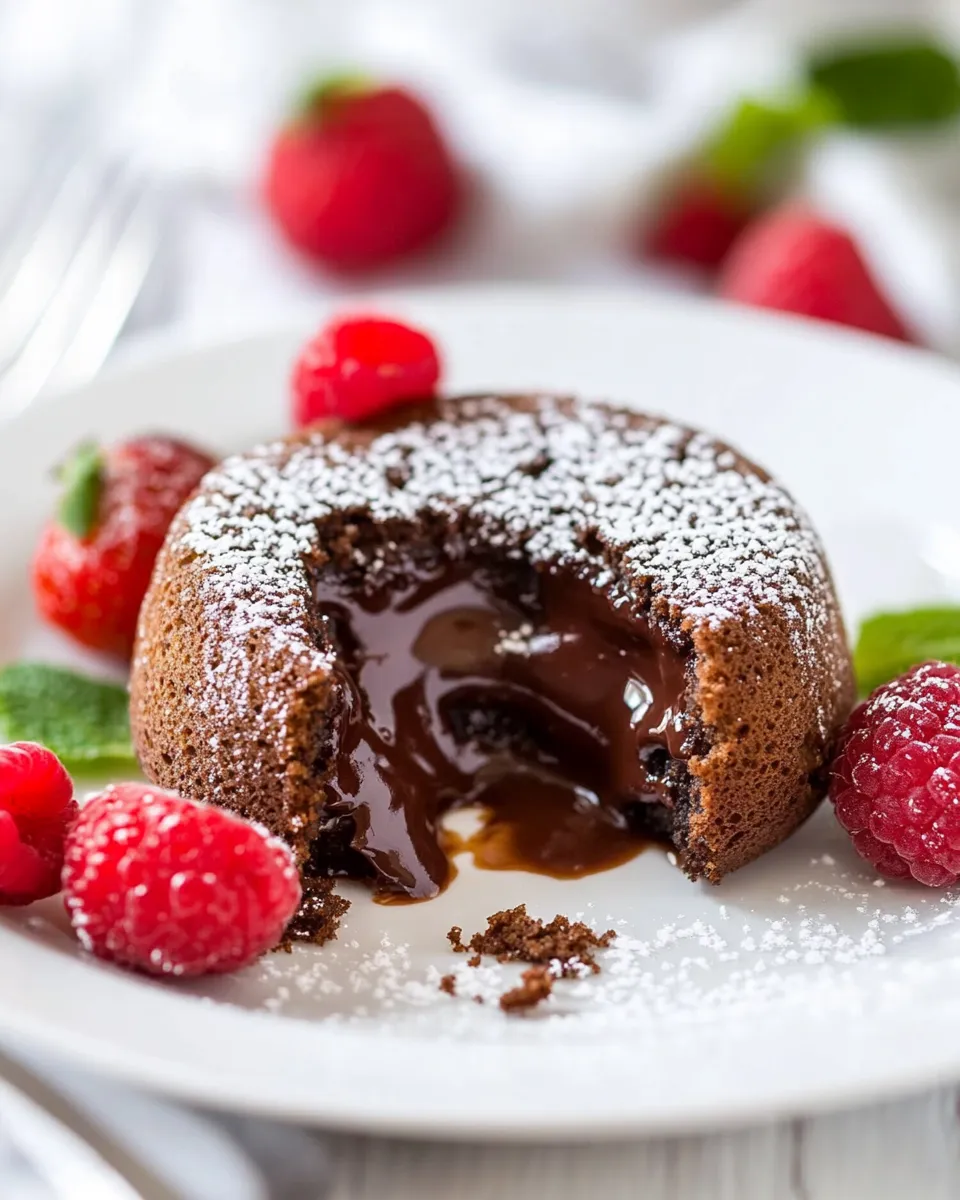
The key to perfect Molten Chocolate Lava Cakes lies in balancing the cooking time and the batter’s consistency. The combination of whole eggs and egg yolks creates a rich and creamy texture, while the semisweet chocolate chips provide that deep chocolate flavor that we all adore. When baked just right, the outer layer sets, while the center remains liquid, creating that signature molten core. Don’t worry; even if you’re a novice baker, following this recipe will yield impressive results every time.
Ingredient Notes
- 8 Tbsp unsalted butter: Use this to create the luscious texture of the cake. Cut into slices for easy melting.
- 6 oz semisweet chocolate chips: These chips melt beautifully and provide the rich chocolate flavor.
- 2 large eggs: Whole eggs add structure and moisture to the cakes.
- 2 large egg yolks: Extra yolks enhance the richness of the batter.
- 1/4 cup sugar: Just the right amount of sweetness to balance the chocolate.
- 1/4 tsp salt: Enhances the chocolate flavor.
- 1 tsp vanilla extract: Adds a warm, aromatic touch to the dessert.
- 3 Tbsp all-purpose flour: Just enough to give the cakes structure; be sure to dust your ramekins with flour too.
Hardware & Gadgets
- Ramekins: Individual-sized ramekins are perfect for baking these cakes.
- Mixing bowls: Use these for melting chocolate and mixing the batter.
- Whisk: Essential for blending the ingredients smoothly.
- Spatula: A silicone spatula works best for folding the batter.
- Baking tray: To place the ramekins in the oven.
Method: Molten Chocolate Lava Cakes
Step 1: Preheat Your Oven
Preheat your oven to 425°F (220°C). This high temperature is crucial for achieving that perfect molten center.
Step 2: Prepare Your Ramekins
Grease each ramekin with a bit of unsalted butter and dust with flour to ensure the cakes release easily after baking.
Step 3: Melt Chocolate and Butter
In a microwave-safe bowl, combine the sliced unsalted butter and semisweet chocolate chips. Heat in the microwave in 30-second intervals, stirring in between, until completely melted and smooth.
Step 4: Mix the Batter
In a separate mixing bowl, whisk together the whole eggs, egg yolks, sugar, salt, and vanilla extract until well combined. Gradually add the melted chocolate mixture to the egg mixture, stirring continuously to avoid cooking the eggs.
Step 5: Fold in the Flour
Gently fold in the all-purpose flour until just combined. Be careful not to overmix; you want to keep the batter light and airy.
Step 6: Fill the Ramekins
Evenly distribute the batter among the prepared ramekins, filling each about 3/4 full.
Step 7: Bake
Place the ramekins on a baking tray and bake for 12-14 minutes, or until the edges are set but the center is still soft. Keep a close eye on them; overbaking will result in a less molten center.
Step 8: Serve Immediately
Once baked, remove the cakes from the oven and let them cool for a minute. Carefully run a knife around the edges to loosen, then invert onto a plate. Serve immediately for the best molten effect!
Make It Fit Your Plan
- Gluten-free: Substitute all-purpose flour with a gluten-free blend.
- Dairy-free: Use dairy-free chocolate and coconut oil instead of butter.
- Nut-free: Ensure that the chocolate chips are nut-free and check for cross-contamination.
- Flavor variations: Experiment by adding a pinch of espresso powder or a few drops of orange extract for a twist.
Problems & Prevention
- Too much cooking: If the cakes are overcooked, the center will not be molten. Keep an eye on them during the last few minutes.
- Sticking to ramekins: Ensure to properly grease and flour the ramekins to prevent sticking.
- Hard centers: If your cakes are too firm, reduce the baking time by a minute or two.
- Uneven baking: Place the ramekins in the center of the oven for even heat distribution.
Save for Later: Storage Tips
If you have any leftover Molten Chocolate Lava Cakes (though it’s hard to imagine!), store them in an airtight container in the refrigerator for up to two days. To reheat, pop them in the microwave for about 20-30 seconds to revive that gooey center. These cakes are best enjoyed fresh, so try to bake only what you need!
Helpful Q&A
Can I make the batter ahead of time?
Absolutely! You can prepare the batter and fill the ramekins, then cover them and refrigerate for up to 24 hours. Just add a couple of extra minutes to the baking time if they’re cold from the fridge.
Can I use different types of chocolate?
Yes! While semisweet chocolate is traditional, you can use dark chocolate for a richer flavor or milk chocolate for a sweeter cake. Just ensure that the chocolate you choose melts well.
What if I don’t have ramekins?
If you don’t have ramekins, you can use a muffin tin, but the molten effect may vary slightly. Just be sure to adjust the baking time as needed!
Can I add fillings to the cakes?
Sure! You can add a spoonful of Nutella or a piece of caramel in the center of the batter before baking for an extra surprise.
Final Thoughts
Molten Chocolate Lava Cakes are the epitome of chocolate indulgence, with their rich, gooey centers and decadent flavor. Whether for a special occasion or a weeknight treat, this recipe will surely become a go-to favorite. The simplicity of ingredients and the ease of preparation make these lava cakes accessible to everyone, regardless of baking experience. So gather your ingredients, preheat that oven, and get ready to impress yourself and anyone lucky enough to share this delightful dessert with you. Enjoy every molten bite!
Molten Chocolate Lava Cakes
Ingredients
Equipment
Method
- Preheat your oven to 425°F (220°C) for a perfect molten center.
- Grease each ramekin with unsalted butter and dust with flour.
- In a microwave-safe bowl, combine butter and chocolate chips. Heat in 30-second intervals until melted and smooth.
- In a mixing bowl, whisk together eggs, yolks, sugar, salt, and vanilla until combined. Gradually add melted chocolate, stirring continuously.
- Gently fold in flour until just combined; do not overmix.
- Evenly distribute the batter among the prepared ramekins, filling each about 3/4 full.
- Place ramekins on a baking tray and bake for 12-14 minutes, or until edges are set but the center is still soft.
- Remove from oven, cool for a minute, run a knife around edges, and invert onto a plate. Serve immediately.
Notes
- For gluten-free, substitute all-purpose flour with a gluten-free blend.
- For dairy-free, use dairy-free chocolate and coconut oil instead of butter.
- Store leftovers in an airtight container in the fridge for up to two days.